Crocheting a camera pouch is a practical way to protect your camera while adding a personal touch. Even if you’re new to crochet, this project is easy to follow and can be finished in a weekend. A handmade camera pouch is also a great gift for friends who love photography.
Table of Contents
What You Need
To get started, gather these basic supplies:
- Worsted weight cotton yarn (about 50g)
- 4.5mm crochet hook
- Tapestry needle
- Button or snap for closure
- Scissors
- Measuring tape
Choose a yarn color you like. Cotton yarn is durable and easy to wash, making it a smart option for camera accessories.
Step-by-step Guide
Follow these steps to crochet your camera pouch:
- Measure your camera. Write down the height, width, and depth. Add 1 inch to each measurement for seam allowance.
- Make a foundation chain. Chain enough stitches to match the width plus depth of your camera.
- Crochet the body. Use single crochet (sc) in each chain. Turn at the end of each row. Continue until your piece matches the height plus depth.
- Shape the pouch. Fold the rectangle in half. Sew the side and bottom edges using a slip stitch or whip stitch.
- Create a closure. Crochet a small flap at the open edge. Attach a button or snap to keep your camera secure.
- Weave in loose ends. Use the tapestry needle for a clean finish.
Example Sizing
Suppose your camera is 4” wide, 2” deep, and 3” tall. Your starting chain should measure about 6” (4 + 2) and your rows should total 5” (3 + 2).
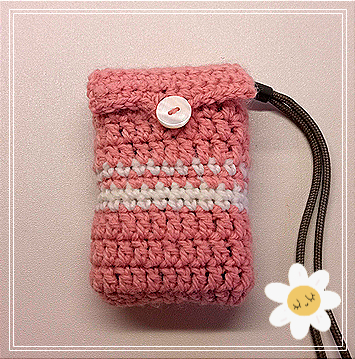
Credit: ribblr.com
Yarn And Hook Comparison
Different yarn types and hook sizes create different textures. Here’s a quick comparison:
| Yarn Type | Texture | Durability |
|---|---|---|
| Cotton | Firm | High |
| Acrylic | Soft | Medium |
| Hook Size | Stitch Tightness | Best For |
|---|---|---|
| 4.0mm | Tight | Small cameras |
| 5.0mm | Loose | Larger pouches |
Extra Tips
- For extra padding, use a double strand of yarn.
- Add a lining with soft fabric for more protection.
- Don’t forget to check your gauge—a tighter stitch gives better support.
One detail beginners often miss is the importance of a sturdy closure. A weak closure can let your camera slip out. Also, washing the yarn before starting prevents shrinking later.
A crochet pouch is more than just protection. It shows your style and can be customized with colors or embellishments. If you want more crochet ideas, check Craftsy for tutorials and inspiration.

Credit: www.youtube.com
Frequently Asked Questions
How Long Does It Take To Crochet A Camera Pouch?
Most people can finish in 2-3 hours, depending on skill level and pouch size.
Which Yarn Is Best For A Camera Pouch?
Cotton yarn is preferred for its strength and easy care.
Can I Wash My Crocheted Pouch?
Yes, most cotton yarn pouches are machine washable. Always check the yarn label.
What If My Pouch Is Too Big?
You can adjust by adding or removing rows. Test-fit your camera before finishing.
Do I Need Special Skills To Crochet A Pouch?
No. Basic stitches like single crochet are enough. Even beginners can complete this project.