Table of Contents
How Do Blink Camera Mounts Work?
Blink cameras are popular for home security because they are wireless and easy to set up. A big part of this ease comes from their camera mounts. These mounts are designed to be simple yet effective, allowing you to place your Blink cameras exactly where you need them. Understanding how these mounts work can help you get the most out of your security system.
The core idea behind Blink camera mounts is versatility and stability. They need to hold the camera securely in place, whether it’s mounted on a wall, ceiling, or another surface. At the same time, they should allow for easy adjustment so you can get the perfect viewing angle. Most Blink mounts use a combination of a base and an adjustable arm or ball joint.
Types Of Blink Camera Mounts
Blink offers several types of mounts, and each has its own way of working. The most common ones are the standard mounts that come with most cameras and specialty mounts for specific installation needs.
Standard Wall Mounts
The mount that usually comes in the box with your Blink camera is a simple wall mount. It typically consists of two main parts: a base that screws into the wall and the camera clip that attaches to the camera.
The base is usually a flat piece of plastic with holes for screws. You’ll often find that the screws and wall anchors are included, making installation straightforward. Once the base is securely attached to the wall, the camera clip slides or snaps onto it.
This clip is designed to hold the Blink camera firmly.
Many of these standard mounts also include a ball-and-socket joint or a swivel arm. This allows you to tilt and pan the camera after it’s mounted. You simply loosen a small screw or ring on the joint, adjust the camera to the desired position, and then tighten it again to keep it locked in place. This adjustability is key to ensuring your camera captures the widest possible area.
Outdoor Mounts
For cameras used outdoors, like the Blink Outdoor or Blink XT series, the mounts are often designed to be more weather-resistant. They might have a slightly different design to protect the camera and connection from the elements.
These mounts can be similar in principle to the indoor ones, using a secure base and an adjustable arm. However, the materials might be more durable plastic or even metal. Some outdoor mounts also come with a sun shield or rain cover integrated into the design. This extra layer helps protect the camera lens from direct sunlight glare and rain, improving video quality and camera longevity.
Ceiling Mounts And Corner Mounts
Some Blink cameras, especially those designed for indoor use like the Blink Mini, might come with or have optional mounts for specific placements. Ceiling mounts often involve a base that attaches to the ceiling, with an arm that extends down to hold the camera.
Corner mounts are designed to fit into the corner of a room, offering a wider field of view. These mounts usually have an angled base that allows them to be screwed into both walls simultaneously. The principle remains the same: a secure base and an adjustable mechanism for angling the camera.

Credit: support.blinkforhome.com
How The Mounting Mechanism Works
The way the camera attaches to the mount is usually quite simple, designed for quick installation and removal.
Camera Clip And Base
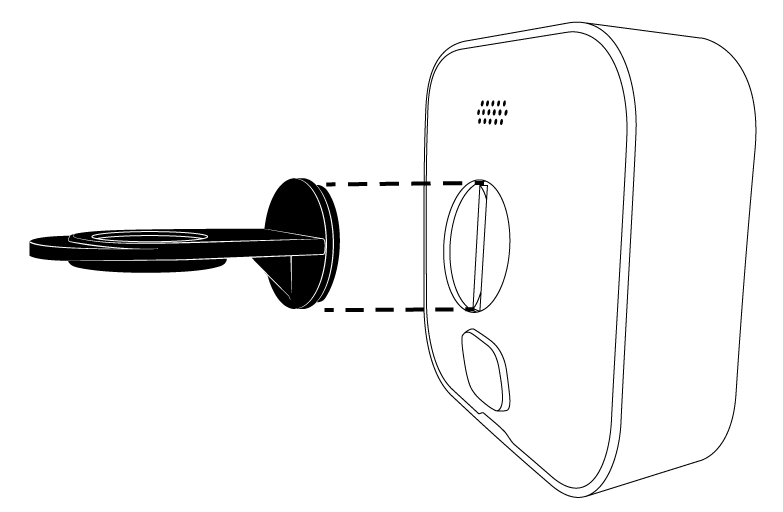
Most Blink cameras have a small mounting point on the back or bottom. This might be a threaded insert or a specific shape that clicks into the mount. The mount itself has a corresponding clip or slot that engages with this point on the camera.
For example, the Blink XT2 and Blink Outdoor cameras have a small screw hole at the bottom. The mount’s arm has a screw that goes into this hole, holding the camera. The arm itself then attaches to a swivel base.
The Blink Mini camera uses a different approach. It has a small, integrated stand that can be flipped out. This stand has a slot that allows it to slide onto a small wall mount base. This design makes it very easy to detach the camera for charging or repositioning.
Adjustability And Locking
Once the camera is attached to the mount, you need to adjust its angle. This is where the swivel, tilt, and rotation features come into play. As mentioned, many mounts use a ball-and-socket joint. This joint allows for a wide range of motion.
To lock the camera in place, you typically tighten a locking ring or screw on the joint. This friction mechanism holds the ball in the socket, preventing the camera from moving. When you want to adjust the angle, you loosen this ring, move the camera, and then retighten it.
Some mounts use a ratcheting mechanism or a series of gears. These are less common for Blink but can offer very precise adjustments. However, the simplicity of the ball-and-socket design is often preferred for ease of use and quick setup.
Installation Process Explained
Installing a Blink camera mount is generally a DIY-friendly task. Here’s a typical process:
- Choose the Location: Decide where you want to place your camera. Consider the field of view you need and ensure the camera will have a good Wi-Fi signal.
- Mark Mounting Holes: Hold the mount base against the wall or surface. Use a pencil to mark where the screw holes should go.
- Drill Holes (if necessary): If you are mounting on a hard surface like brick or stucco, you might need to drill pilot holes. Use the appropriate drill bit size for the provided wall anchors.
- Attach Wall Anchors: Insert the wall anchors into the drilled holes. Tap them gently with a hammer if needed until they are flush with the surface.
- Secure the Mount Base: Place the mount base over the holes (or anchors) and insert the screws. Tighten the screws firmly until the base is secure.
- Attach Camera to Mount: Connect your Blink camera to the mount clip or arm, as designed for your specific camera model.
- Adjust the Angle: Position the camera to get the best view. Then, tighten the locking mechanism on the mount’s joint to secure the angle.
- Connect to Wi-Fi: Follow the Blink app instructions to connect your camera to your Wi-Fi network.
Pro Tip:
When mounting outdoors, consider the direction of the sun. Avoid pointing the camera directly into the sun, as this can cause glare and make the video unusable. Also, ensure the mount is placed on a surface that can support the camera’s weight, even in strong winds.
Credit: support.blinkforhome.com
Benefits Of Proper Mounting
Using the right mount and installing it correctly offers several advantages:
- Optimal Field of View: Proper mounting ensures your camera covers the area you intend to monitor. A poorly positioned camera might miss crucial events.
- Security and Stability: A securely mounted camera is less likely to be accidentally knocked over or stolen. This is especially important for outdoor cameras.
- Ease of Maintenance: Most Blink mounts allow for easy removal of the camera for charging or battery replacement.
- Durability: Using mounts designed for the environment (e.g., outdoor mounts for outside) helps protect your camera from weather damage.
Common Mounting Challenges And Solutions
While Blink mounts are user-friendly, some common issues can arise:
- Weak Wi-Fi Signal: If your chosen mounting spot has a weak signal, the camera’s performance will suffer. Solution: Try mounting closer to your Wi-Fi router or consider a Wi-Fi extender.
- Surface Material: Mounting on certain surfaces like metal or glass might require different types of adhesives or mounting hardware than what is provided. Solution: Research the best mounting options for your specific surface. Some third-party mounts offer adhesive options.
- Camera Slipping: If the locking mechanism on the mount isn’t tightened enough, the camera might slip. Solution: Ensure you tighten the locking ring or screw firmly after setting the desired angle.
Credit: www.doorbellmount.com
Third-party Mounts
Besides the official Blink mounts, a variety of third-party mounts are available. These can offer different features, such as longer arms, more robust materials, or unique mounting solutions like magnetic mounts or gooseneck mounts. These can be useful