Table of Contents
Game Camera Mounting Ideas For Better Wildlife Photos
Game cameras, also known as trail cameras, are fantastic tools for anyone interested in wildlife. They let you see animals that might be shy or active at times when you can’t be there. But getting great photos isn’t just about the camera itself; how you mount it makes a huge difference. A poorly placed camera might miss animals entirely or capture blurry, uninteresting shots. This guide explores smart game camera mounting ideas to help you get the best possible results.
Choosing the right spot is key. Think about animal behavior and natural travel patterns. Where do deer usually walk? Where do squirrels or birds nest? Observing your area before setting up can reveal prime locations. Consider the sun’s path too; direct midday sun can wash out images or overheat the camera.
Understanding Your Mounting Options
Mounting a game camera effectively requires thinking about stability, concealment, and the angle of view. You want the camera to be secure so that wind or animal activity doesn’t shake it. It also needs to blend into its surroundings to avoid startling animals or attracting unwanted attention from people.
Finally, the angle needs to capture the action you’re interested in without too much foreground or background clutter.
Tree Mounting
Mounting on a tree is the most common method. Trees offer natural support and can help camouflage the camera. When choosing a tree, look for one that is sturdy and has a relatively flat surface for mounting. The height of the mount is important; too low and the camera might get bumped, too high and you might miss capturing details. A height of about 3-5 feet off the ground is often ideal for general wildlife.
For attaching to a tree, you can use several methods. Many cameras come with a basic strap system. These are simple but can sometimes slip on smooth bark. For a more secure setup, consider using a mounting bracket designed for trail cameras. These often screw directly into the tree (use sparingly and consider tree health) or attach with heavy-duty straps. Some brackets allow you to adjust the camera’s angle, which is very useful for fine-tuning your shot.
Post Mounting
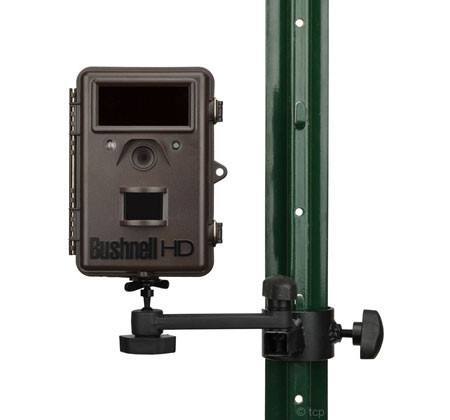
If trees aren’t available or suitable, mounting a game camera on a post is a great alternative. You can use a sturdy metal T-post, a wooden post, or even a heavy-duty stake. This method offers flexibility in placement, allowing you to set up cameras in open fields or along fence lines. Ensure the post is driven deep into the ground to prevent wobbling.
Using a post allows for precise camera positioning. You can often get closer to the ground or adjust the height easily. This is especially useful if you’re trying to capture ground-level activity or specific types of animals. Some hunters even create custom mounting systems using PVC pipes or metal poles for a durable and adjustable setup.
Ground Mounting
In some situations, ground mounting is the best approach. This might involve placing the camera on a small rock, a log, or even a specially designed low-profile mount. This is particularly effective for capturing insects, amphibians, or small mammals that don’t frequent higher paths. It’s also useful for getting a unique perspective on larger animals.
When mounting on the ground, ensure the camera is stable and protected. You might need to build a small, stable base or use rocks to support it. Be mindful of moisture and potential flooding if placing it in a low-lying area.
Camouflage is also critical here, as the camera will be at eye level with many creatures.

Credit: www.the-denture-place.com
Advanced Mounting Techniques And Considerations
Beyond the basic mounting locations, several advanced techniques can significantly improve your game camera’s performance and longevity. These involve considering the environment, animal behavior, and camera protection.
Angling And Field Of View
The angle at which you position your camera is crucial for capturing clear, useful images. For general wildlife observation, a straight-on view of a trail or clearing is often best. If you’re monitoring a feeder or a specific point of interest, aim the camera directly at it. Avoid pointing the camera directly into the sun, especially during peak hours, as this can cause glare and poor image quality.
Think about the camera’s field of view. Most game cameras have a wide-angle lens. If you mount it too close to an animal’s path, you might only capture parts of them. Experiment with distance and angle to get the whole animal in frame, along with some of its environment. A common mistake is placing the camera too close to frequently used trails, resulting in many photos of just legs or tails.
Camouflage And Concealment
Making your game camera blend in with its surroundings is vital for effective, unobtrusive wildlife monitoring. Animals are naturally wary of new objects in their environment. You can use natural materials like leaves, branches, or even mud to help camouflage the camera. Many hunters also use specialized camouflage wraps or spray paint designed for outdoor equipment.
Pro Tip: Avoid using overly bright or unnatural colors for camouflage. Stick to greens, browns, and grays that match the local vegetation. Also, be careful not to block the camera’s lens or motion sensor.
Security And Protection
Unfortunately, game cameras can be targets for theft or vandalism. To protect your investment, consider using a security box designed for your specific camera model. These metal boxes add a layer of physical protection and often include a cable lock system. Mounting the camera higher on a tree or in a less accessible location can also deter theft.
Furthermore, cameras need protection from the elements. While most are designed for outdoor use, extreme weather can still cause damage. Consider mounting the camera under a slight overhang if possible, or use a rain cover. Keeping it clean from dirt and debris will also ensure it functions correctly.
Creative Game Camera Mounting Ideas
Sometimes, you need to think outside the box to get the perfect shot. Here are a few creative ideas:
- The “Spider” Mount: For cameras that don’t have a built-in bracket, a heavy-duty zip tie or bungee cord can be wrapped around the camera and then secured to a branch or post. This is a quick, temporary solution but can work in a pinch.
- The “Fence Post” Rig: If you have a sturdy fence line, a camera can be mounted directly to a fence post using U-bolts or a custom bracket. This is ideal for monitoring fence crossings or areas adjacent to pastures.
- The “Rock” Hide: For ground-level monitoring, find a large, stable rock. You can place the camera behind or beside it, using the rock as a natural blind. This works well in rocky terrain or creek beds.
- The “Overhead” View: In some cases, mounting a camera on a sturdy branch *above* a trail or feeding area can provide a unique downward-looking perspective. This requires careful placement to avoid foliage obstruction.
- The “Hidden” Camera: For ultimate concealment, mount the camera inside a hollowed-out log or behind a false panel made to look like natural debris. This requires more effort but can yield incredible, undisturbed footage.
Credit: www.grandcrucreative.com
Comparison Of Mounting Methods
Here’s a quick look at how different mounting methods stack up:
| Mounting Method | Pros | Cons | Best For |
|---|---|---|---|
| **Tree Mount** | Natural support, good camouflage | Limited placement options, can slip | General wildlife, trails, feeders |
| **Post Mount** | Flexible placement, adjustable height | Requires ground penetration, less natural | Open fields, fence lines, specific monitoring |
| **Ground Mount** | Unique perspectives, close-up shots | Vulnerable to elements, requires stability | Small animals, insects, ground-level activity |
| **Security Box** | Theft deterrence, weather protection | Adds bulk and cost | High-traffic areas, valuable equipment |