Table of Contents
Capturing The Thrill: The Best Way To Mount Your Camera For Skiing
Skiing is an exhilarating sport, and capturing those epic runs is a fantastic way to relive the adrenaline and share the experience. But getting those dynamic, immersive shots isn’t just about pointing your camera downhill. The best way to mount your camera for skiing depends on the kind of footage you want and the gear you have. From smooth, cinematic views to heart-pounding first-person perspectives, the right mount makes all the difference.
Choosing the wrong mount can lead to shaky footage, missed moments, or even a lost camera. It’s crucial to consider stability, field of view, and how the mount will affect your skiing. Many skiers opt for action cameras like GoPros, known for their durability and wide-angle lenses, but the mounting system is where the magic happens.
Let’s explore the most effective ways to attach your camera for unforgettable ski footage.
Helmet Mounts: The Classic Perspective
Helmet mounts are the go-to for many skiers because they offer a stable, first-person view that closely mimics what the skier sees. This perspective is incredibly immersive, putting the viewer right there on the slopes.
Front Helmet Mount
Attaching the camera to the front of your helmet provides a clear view of the terrain ahead. This is excellent for capturing your line, the bumps you’re navigating, and the overall landscape. Most action cameras come with adhesive mounts that stick directly to the helmet’s surface. It’s important to ensure the helmet has a smooth, relatively flat area for the mount to adhere securely.
- Pros: Immersive POV, captures terrain well, relatively stable.
- Cons: Can be bulky, might catch wind, limited view of your own actions.
Top Helmet Mount
Mounting on the top of your helmet offers a slightly different, often more stable perspective. This can reduce the feeling of motion sickness for some viewers compared to a front mount. It also keeps the camera higher, potentially offering a wider, less obstructed view. However, it can feel less personal than a front-facing shot.
- Pros: Very stable, wide field of view, less wind resistance than front mount.
- Cons: Less personal POV, can be top-heavy, might affect helmet balance.
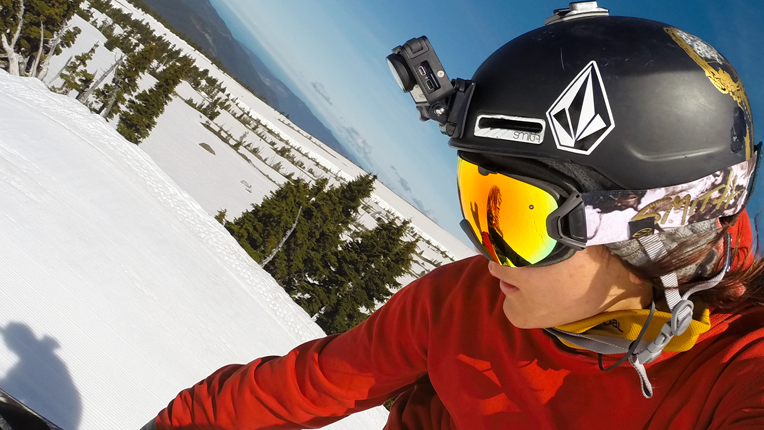
Side Helmet Mount
A side helmet mount can provide a unique angle, showing both the terrain and a bit of your body or skis. This can add a dynamic element to your footage, giving a sense of movement and action. However, it’s often less stable than front or top mounts and can be more prone to vibrations.
- Pros: Unique angle, shows more of the skier’s action.
- Cons: Less stable, can be distracting, may not capture the full view of the slope.
Pro Tip: Always clean your helmet surface thoroughly with rubbing alcohol before applying any adhesive mount. This ensures a strong, lasting bond that won’t fail on a bumpy run.

Credit: www.bergreenphotography.com
Chest Mounts: Dynamic And Stable
Chest mounts are another popular option, offering a stable, dynamic view that captures both the skier and the environment. This perspective feels less like a helmet cam and more like you’re watching yourself ski.
Standard Chest Mount
A standard chest mount straps around your torso, positioning the camera on your sternum. This provides a smooth, low-angle view that emphasizes speed and the motion of your skis. It’s excellent for showing off jumps, carving turns, and the overall flow of your skiing. Because the camera is closer to your center of gravity, footage tends to be less shaky.
- Pros: Very stable, shows skis and terrain, good sense of speed.
- Cons: Can be slightly restrictive, might not capture facial expressions well.
In my experience, chest mounts offer a great balance between immersion and stability. The footage often feels more professional and less “home video” than some other options.
Pole Mounts: Unique Angles And Advanced Shots
Mounting your camera on a ski pole opens up a world of creative possibilities, allowing for unique tracking shots and dynamic angles.
Pole Mount Attachment
These mounts typically clamp onto your ski pole, placing the camera either above or below the pole itself. Mounting it below the pole can create a “following shot” effect, as if the camera is gliding alongside you. Mounting it above offers a higher, more sweeping view.
- Pros: Unique tracking shots, dynamic angles, less intrusive than helmet mounts.
- Cons: Can be difficult to control, footage can be very shaky if not handled well, risk of losing the camera if not secured.
Example: To achieve a smooth “following shot,” try mounting the camera below the pole and keeping the pole relatively steady as you ski. This requires practice but can yield stunning results.
Credit: www.videomaker.com
Other Mounting Options And Considerations
Beyond the primary locations, other factors and mounts can enhance your skiing videography.
Wrist Mounts
While less common for skiing, a wrist mount can offer a very immediate, hand-held feel. It’s best for static shots or very slow movements, as the natural motion of skiing will create significant shake.
- Pros: Quick to deploy, unique perspective.
- Cons: Very shaky footage, limited field of view, not ideal for action.
Handheld Stick/grip
A simple selfie stick or grip can be used, but this requires constant attention and skill to keep stable. It’s generally not recommended for high-speed skiing.
- Pros: Easy to adjust camera angle on the fly.
- Cons: High risk of dropping, very shaky footage during skiing.
Drone Footage
For truly cinematic shots, consider using a drone. Drones can capture breathtaking aerial views of the skier and the mountain. However, this requires significant skill, practice, and awareness of regulations, especially in ski resorts.
- Pros: Professional, cinematic, epic perspectives.
- Cons: Expensive, requires skill and practice, regulations, weather dependent.
Choosing The Right Mount: Key Factors
When deciding on the best mount, consider these points:
- Desired Perspective: Do you want a first-person view (helmet), a dynamic action shot (chest), or a creative tracking shot (pole)?
- Stability: How smooth do you need your footage to be? Chest and top-helmet mounts generally offer the most stability.
- Ease of Use: How quickly do you need to attach and detach the camera? Helmet and chest mounts are usually straightforward.
- Safety: Ensure the mount is securely attached and won’t interfere with your skiing or helmet’s safety features. A loose camera is a hazard.
- Durability: Skiing environments are harsh. Your mount needs to withstand cold, moisture, and potential impacts.
Here’s a quick comparison of common mount types:
| Mount Type | Stability | Immersion | Ease of Use | Best For |
|---|---|---|---|---|
| Front Helmet | Good | High | Easy | POV, terrain focus |
| Top Helmet | Very Good | Medium | Easy | Wide views, stability |
| Chest Mount | Excellent | Medium-High | Easy | Dynamic action, speed |
| Pole Mount | Poor to Fair | Medium | Moderate | Creative tracking shots |

Credit: www.youtube.com
Advanced Tips For Better Ski Footage
- Gimbals: For extremely smooth footage, especially with handheld setups or drones, a gimbal can be invaluable. However, they add bulk and complexity.
- Settings: Experiment with your camera’s field of view (FOV) settings. A wider FOV captures more