Installing home security cameras is a smart way to protect your property. It provides peace of mind and helps deter potential intruders.
But how do you go about setting them up in the best way? Home security is more important now than ever. With technology advancing, installing cameras has become easier and more affordable. Many homeowners are opting for these systems to enhance their safety.
But the process can seem daunting if you haven’t done it before. Where should the cameras go? What tools are needed? This guide will walk you through the essentials of installing home security cameras. From choosing the right spots to understanding the equipment, we will cover it all. Secure your home efficiently and confidently with these straightforward steps.
Table of Contents
Choosing The Right Camera
Security cameras come in different types. Wired cameras connect directly to a power source. Wireless cameras use Wi-Fi to send data. Some cameras are indoor-only. Others are made for outdoor use. Bullet cameras have a long shape. Dome cameras are round and small. Each type has its own use. Pick the one that fits your needs.
Look for cameras with night vision. This helps see in the dark. Motion detection alerts you to movement. Some cameras have two-way audio. This lets you talk and listen. High-definition video is clearer. Storage options are important too. Some use a cloud. Others have SD cards. Choose features that best suit your home.

Credit: www.gensecurity.com
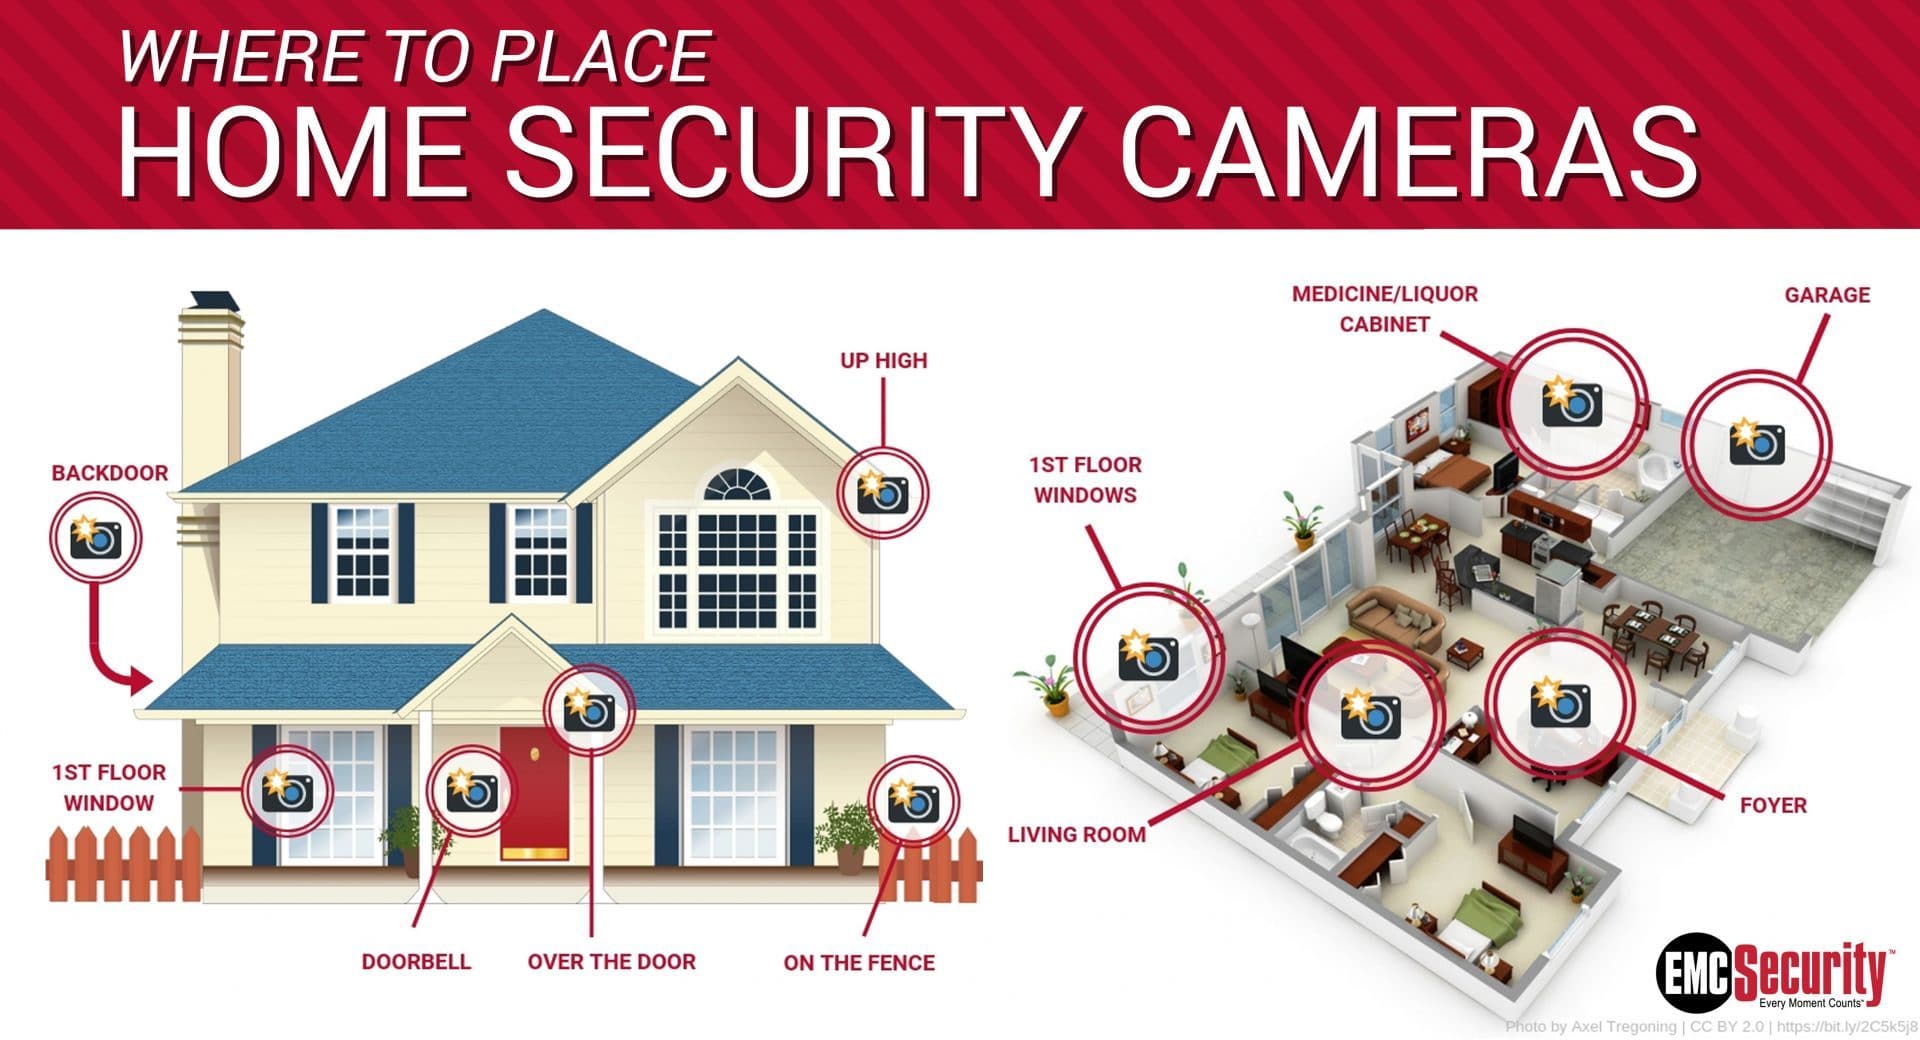
Planning Camera Placement
Different cameras are needed for indoor and outdoor areas. Indoor cameras focus on rooms and hallways. They help watch over valuables and entry points. Outdoor cameras need to handle weather. They guard doors, windows, and driveways. Choose cameras that fit each area’s needs.
Cameras should cover all important spots. Look for places burglars might hide. Avoid blind spots where cameras can’t see. Adjust angles to capture wide areas. Use multiple cameras for better coverage. This stops intruders from sneaking past unseen.
Gathering Necessary Tools
You need some basic tools to start. A drill is very important. It helps to make holes. You also need a screwdriver. It tightens screws in place. Don’t forget a ladder. It helps reach high spots. A measuring tape is useful too. It helps measure the distance. You will need cable ties. They keep wires neat and tidy. Always have a pencil. It marks spots on walls.
Always stay safe while working. Use safety goggles. They protect your eyes. Gloves are also important. They keep your hands safe. A hard hat is necessary. It protects your head. Wear a safety harness if working high. It prevents falls. Earplugs can help. They reduce noise. Remember to wear sturdy shoes. They keep your feet safe.
Preparing Your Home
First, clear any obstacles around the installation spots. Move plants and furniture out of the way. This makes sure nothing blocks the camera’s view. Dust off the surfaces to ensure a clean setup. Check for any wires or cords that might be in the way. This helps in avoiding accidents during installation. Use a ladder if the spot is high up. Make sure the ladder is sturdy and safe.
Check your Wi-Fi signal in the camera area. A weak signal might cause problems. Move the router if needed for better connectivity. Use a Wi-Fi extender if the signal is too weak. Test the connection before starting installation. Make sure the camera is close enough to the router. This ensures smooth and clear video streaming. Double-check the password for your Wi-Fi.
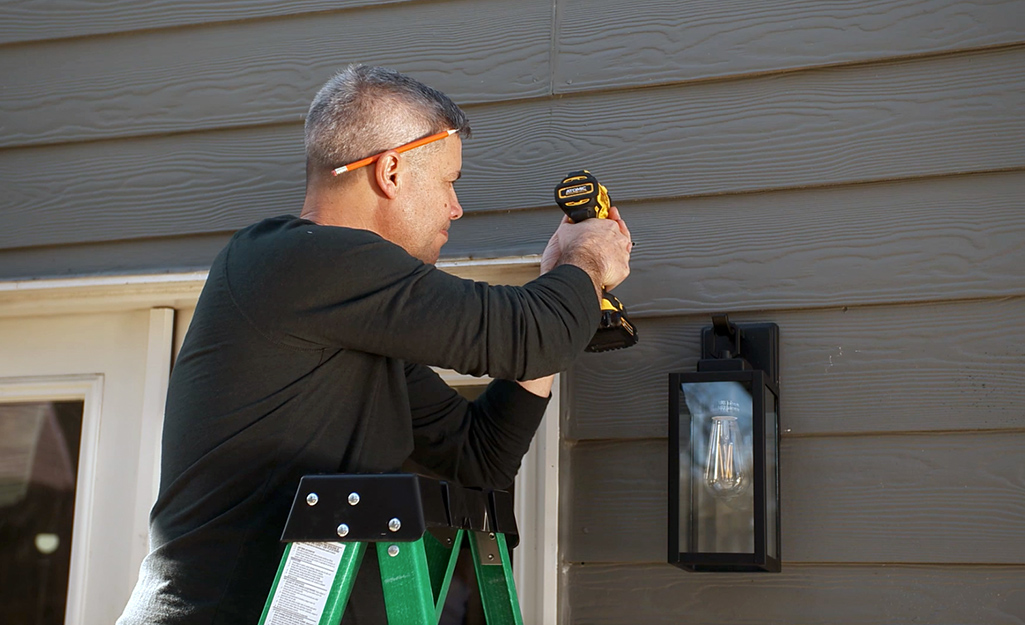
Installing The Camera Mount
Start by choosing the right spot for the camera mount. Make sure it’s high enough to see the area. Use a drill to make holes for the screws. Insert the anchors into the holes. This helps the brackets stay firm. Place the bracket over the anchors. Secure them with screws. Tighten the screws until the bracket does not move. Check to ensure the mount is secure.
Once the bracket is secure, attach the camera. Adjust its angle to cover the desired area. The lens should point at the spot you want to watch. If needed, loosen the screws a bit to adjust. After setting the angle, tighten the screws again. Check the camera view through your phone or monitor. Make sure you can see everything you need. Adjust again if necessary.
Credit: www.emcsecurity.com
Connecting The Camera
Setting up home security cameras involves connecting the camera correctly. Start by choosing a secure location for installation. Ensure the camera is powered and connected to your Wi-Fi network. Follow the manufacturer’s instructions to pair the device with your smartphone or computer for remote viewing.
Wiring And Power Sources
Start by choosing the right power source for your camera. Most cameras need an electric outlet. Some cameras use batteries. Ensure your camera is close to an outlet. Use extension cords if needed. Avoid tangling wires. Keep them neat and tidy. Use wire clips to hold them in place. Safety first. Avoid tripping hazards.
Connecting To Network
Connect your camera to a Wi-Fi network. First, find your Wi-Fi name and password. Next, use the camera’s app on your smartphone. Follow the instructions in the app. Some cameras need an Ethernet cable. Plug it into the router. Ensure the signal is strong. Weak signals cause poor video quality. Keep your router close for best results.
Configuring Camera Settings
To install home security cameras, start by configuring camera settings. Adjust resolution and motion detection for clear images. Ensure night vision is enabled for 24/7 coverage.
Adjusting Resolution
Set the camera’s resolution for clear images. Higher resolution gives better image details. But it uses more data. Lower resolution saves data but may miss details. Find the right balance. Most cameras have different settings. Choose the one that fits your needs.
Setting Up Alerts
Alerts help you know if something happens. Set them to your phone or email. Motion detection alerts are common. They notify if the camera sees movement. Sound detection alerts are also useful. They notify if there is a loud noise. Customize the alerts to your preference. This ensures you get important notifications.
Testing And Troubleshooting
Setting up home security cameras involves testing connections and troubleshooting issues. Ensure proper placement to cover key areas. Regularly check camera feeds for clear images and smooth functioning.
Ensuring Camera Functionality
Turn on your home security cameras. Check if they show clear pictures. Adjust the focus if images are blurry. Move the camera to get the right angle. Test the night vision by turning off the lights. Make sure the camera connects to your Wi-Fi. Check the app on your phone. It should show the live feed. Ensure the motion detection works by waving your hand in front. Listen for any strange noises from the camera.
Resolving Common Issues
Sometimes cameras do not connect. Restart your Wi-Fi router. Check the power supply to the camera. Make sure the plugs are tight. If the camera is offline, reset it. Follow the instructions in the manual. Update the app on your phone. Updates fix many problems. If the picture is fuzzy, clean the camera lens. Avoid placing cameras near metal objects. They block signals. Test again to see if the issue is fixed.
Credit: www.homedepot.com
Frequently Asked Questions
Can I Install Home Security Cameras Myself?
Yes, you can install home security cameras yourself. Many systems offer DIY installation guides. Follow instructions carefully for optimal performance. Ensure cameras have proper power supply and internet connection. Position them strategically for the best coverage. Consider professional help if unsure about installation requirements.
How Do Wireless Home Security Cameras Get Power?
Wireless home security cameras get power through batteries or electrical wiring. Some models use solar panels for charging. Rechargeable batteries are common, offering flexibility in camera placement. Plug-in cameras require nearby outlets. Choose based on your installation preferences and power availability to ensure continuous monitoring and security.
Is It Better To Have Wired Or Wireless Security Cameras?
Wired security cameras offer reliable connectivity and consistent video quality. Wireless cameras provide easy installation and flexibility. Choose wired for stability, wireless for convenience. Consider your needs and environment to decide the best option.
What Is Required To Install Security Cameras?
To install security cameras, gather the necessary equipment: cameras, cables, DVR/NVR, monitor, power supply, and mounting tools. Ensure a stable internet connection for remote access. Plan camera placement for optimal coverage, and check legal regulations on surveillance. Follow manufacturer instructions for installation and setup.
Conclusion
Installing home security cameras boosts your home’s safety and peace of mind. Choose the right camera for your needs. Follow simple setup instructions carefully. Make sure you place cameras strategically. Test the system to ensure everything works properly. Regularly check and maintain the cameras for long-lasting performance.
Home security is important for protecting your family and belongings. Stay alert and enjoy the added security cameras bring. Investing time in setup pays off with increased safety. Your home is your haven, so keep it secure.