Setting up a Bower tripod is straightforward. First, extend the legs.
Then, adjust the height. Now, you’re ready to start using it for photography or videography. Tripods are essential tools for stabilizing cameras. Bower tripods offer reliability and ease of use. They are popular among photographers and videographers. Setting up a tripod correctly ensures steady shots.
It also helps capture clear images and videos. This guide will help you set up your Bower tripod efficiently. Whether you’re a beginner or an expert, a sturdy tripod is crucial. It keeps your camera still during long exposures or zoom shots. Learn how to adjust the legs and secure the camera. Get ready to capture amazing visuals with your Bower tripod.
Credit: www.walmart.com
Table of Contents
Introduction To Bower Tripod
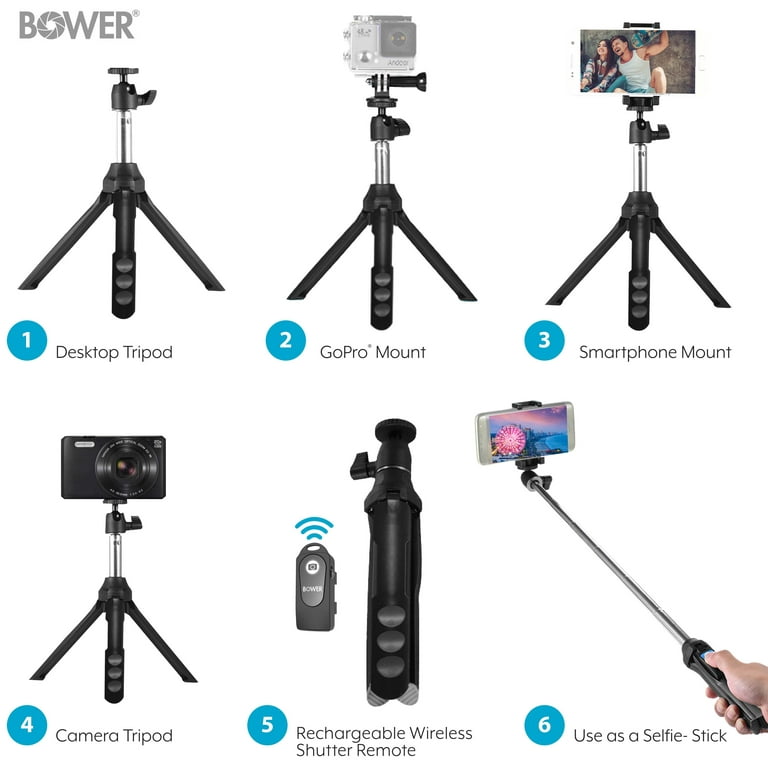
The Bower Tripod helps keep cameras steady. It is great for taking clear photos. Photographers use it to avoid blurry images. It is easy to set up. It is light and strong. It works well outdoors. Beginners find it simple to use. It improves picture quality. Nature lovers enjoy its benefits. It allows long exposure shots. It helps with night photography. It is useful for video recording.
The tripod has adjustable legs. It has a quick-release plate. Locking levers keep legs steady. It folds small for travel. Rubber feet grip the ground. It has a center column for height. Ball head allows smooth movement. It is made of aluminum. It supports heavy cameras. It has a bubble level for alignment. It comes with a carry bag.
Preparing For Setup
Collect all necessary materials before starting. You need a sturdy tripod. Find a flat surface. Make sure you have a camera or equipment. Get any attachment parts ready. This includes screws or bolts. Have a toolbox nearby. It helps with adjustments. Check if you need extra cables.
Safety is very important. Always check the area for hazards. Make sure the tripod is stable. Avoid setting it near edges. Tighten all parts securely. Ensure no loose pieces. Keep your workspace tidy. Remove items that can trip you. Watch out for wires. They can cause falls. Use caution during setup.
Choosing The Right Location
Pick a flat area for your tripod. Uneven ground can cause a fall. Soft soil might not support it well. Grass or sand could shift. Check the ground for firmness. A solid base keeps it steady. Rocks and roots are trip hazards. Clear them from the spot.
Stay away from windy places. Wind can topple your tripod. Avoid places near water. Wet ground can be slippery. Look up for overhead branches. They might fall in bad weather. Choose a safe place away from roads. Cars and bikes can be dangerous.
Assembling The Tripod
First, open the box carefully. Remove each part from the packaging. Lay them flat on the table. Check the parts against the list. This ensures nothing is missing. You should have the legs, the head, and screws. Handle each part gently. This prevents damage. Arrange them neatly for easy assembly.
Spread the legs wide. Lock them in place. Use the knob to tighten them. Make sure each leg is firm. The tripod should stand steady and strong. Adjust the height as needed. Check stability once more. Each leg must be even. This keeps the tripod safe. Your camera will rest securely.
Adjusting Height And Angle
The Bower Tripod has three legs. Each leg has an adjustment mechanism. Use these to change the height. Turn the knobs to loosen or tighten. Make sure the tripod is at your preferred height.
Adjust the angle by tilting the head. Some tripods have a bubble level. This helps keep it straight. Look at the bubble to ensure the tripod is level.
Stability is very important. Spread the legs wide apart. This gives better balance. Check each lock to make sure it is tight. The ground should be flat and even.
Put weight on the center column if needed. This can help in windy conditions. Always double-check before using the camera.
Attaching Devices
Using a Bower tripod is simple. First, make sure the tripod is stable. Check the legs. They should be spread wide. This helps balance the weight. Now, locate the mounting plate. Most tripods have one. It’s where you attach your camera or device. Use the screw on the plate. Turn it to secure your equipment. Make sure it’s tight. But not too tight. You don’t want to damage your device.
Choose the right mount for your equipment. Some mounts are universal. Others are specific. Check your camera’s bottom. Look for a hole. This is for the tripod screw. Align the camera with the screw. Turn it gently. Secure it in place. Test the connection. Your camera should not wobble.
Balance is key. Spread the tripod legs wide. This offers stability. Adjust the leg length. Make the tripod level. Heavy equipment needs extra care. Balance the weight carefully. Place heavier items near the tripod center. This prevents tipping. Always test the balance. Before use, check stability.
Testing Stability
Shake the tripod gently. It should not move much. If it wobbles, check the legs. Ensure all the legs are locked tightly. This helps in keeping the tripod steady. Safety is very important. You don’t want your camera to fall. Repeat the shake test. Make sure it’s stable now.
Adjust the legs. Ensure they all touch the ground. Check the leg locks. Tighten them if needed. The tripod should stand firm. Adjust the center column for balance. Stability is key for good photos. Keep adjusting until it stands still. Now, the tripod is ready.

Credit: www.youtube.com
Troubleshooting Common Issues
Setting up a Bower tripod can be tricky due to loose joints and uneven legs. Ensure stability by tightening all screws and adjusting leg angles evenly. Check each section carefully to avoid issues during your photography session.
Dealing With Uneven Ground
Uneven ground can make your tripod wobbly. Start by adjusting the legs. Extend one leg longer to balance it. Ensure all legs are secure in their positions. Use a spirit level if available. This helps in checking the balance. Try placing the tripod on a stable surface. This might solve the problem quickly. Stability is key for a good setup.
Fixing Loose Components
Loose parts can affect tripod stability. Check all the bolts and screws. Tighten any that are loose. Ensure the head is securely attached. Wiggle the tripod gently to test it. If it moves, check again. Sometimes, rubber pads might wear out. Replace them if necessary. This ensures your tripod stays firm. Always maintain your equipment for best results.
Maintenance Tips
Keep your tripod clean. Use a soft cloth to wipe it. Dust can harm the tripod. Remove dirt after each use. Store it in a dry place. Avoid damp areas. Moisture can damage the tripod. Use a tripod bag for safety. Protects from scratches.
Check all parts often. Make sure screws are tight. Loose screws can cause problems. Inspect for cracks or wear. Replace damaged parts quickly. This keeps the tripod working well. Look for rust on metal parts. Clean rust to prevent spread. A well-maintained tripod lasts longer.

Credit: www.amazon.com
Frequently Asked Questions
How To Set Up A Tripod Step By Step?
Extend the tripod legs to desired length. Lock the leg clips securely. Position the tripod on a stable surface. Attach your camera to the tripod’s quick-release plate. Tighten the screws to secure the camera. Adjust the tripod head for the perfect angle.
Ensure all locks are tight for stability.
How To Connect Bower Bluetooth Remote?
Turn on your Bower Bluetooth remote. Enable Bluetooth on your device. Search for “Bower Remote” in your device’s Bluetooth settings. Select it to pair and connect. Follow any on-screen instructions to complete the setup. Test the remote to ensure successful connection.
How To Connect Phone To Tripod Remote?
Turn on the tripod remote. Enable Bluetooth on your phone. Search for the remote device. Pair them together. Once connected, you can use the remote to take photos or videos. Make sure to check compatibility with your phone model.
How To Set Up A Tripod Level?
Extend the tripod legs evenly on stable ground. Adjust the height to eye level. Use the built-in bubble level to ensure horizontal alignment. Tighten all knobs securely. Attach the camera or device firmly on top. Verify stability before use.
Conclusion
Setting up a Bower tripod is easier than you think. Follow these steps carefully. You’ll find your tripod stable and ready for use. Practice makes perfect, so don’t rush. Adjust the legs for best stability. Secure the camera firmly on the mount.
Check for any loose parts before shooting. This ensures safety and quality photos. Always remember, a well-set tripod enhances your photography. Enjoy the process and capture stunning images. Happy shooting with your Bower tripod!