Mounting a Blink Doorbell Camera is an easy way to improve your home security. This device lets you see, hear, and speak to visitors right from your smartphone. Whether you’re new to smart cameras or have used them before, you can install the Blink Doorbell Camera in less than 30 minutes. In this guide, you’ll learn how to choose the right location, mount your camera safely, and avoid common mistakes.
Table of Contents
Choosing The Best Location
Finding the right spot is key for getting the most from your Blink Doorbell Camera. Most users place it near their front door, but you should consider these factors:
- Height: Mount the camera about 48 inches (1.2 meters) from the ground. This gives a clear view of faces.
- Wi-Fi signal: The camera needs a strong Wi-Fi connection. Test your signal with your phone before installation.
- Weather: Avoid spots exposed to heavy rain or direct sunlight. The Blink camera is weather-resistant, but extreme conditions can affect performance.
Here’s a quick comparison of ideal vs poor locations:
| Location | Visibility | Wi-Fi Strength | Weather Exposure |
|---|---|---|---|
| Near front door | High | Strong | Low |
| Garage entrance | Medium | Medium | Medium |
| Side wall | Low | Weak | High |
What You Need To Mount
Before starting, gather these items:
- Blink Doorbell Camera
- Mounting bracket
- Screws (usually included)
- Screwdriver or drill
- Smartphone for setup
Check the package for all parts. Missing screws or brackets are a common problem for beginners.
Credit: support.blinkforhome.com
Step-by-step Mounting Instructions
- Mark the spot: Use the mounting bracket as a guide. Mark screw holes with a pencil.
- Drill holes: For brick or concrete, use a masonry bit. For wood, a standard bit works.
- Attach the bracket: Screw the bracket firmly to the wall. Avoid overtightening.
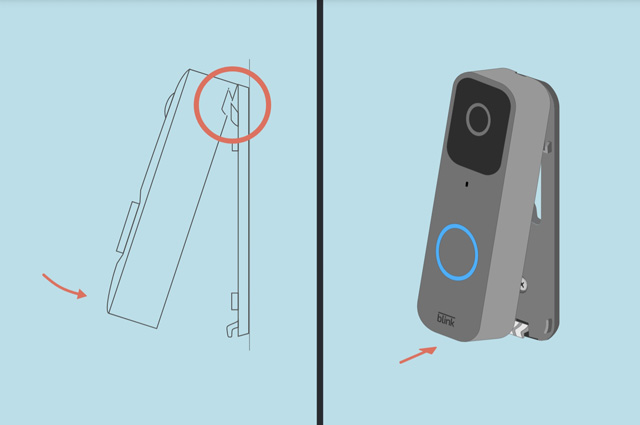
- Snap the camera: Place the Blink Doorbell Camera onto the bracket until it clicks.
- Connect to Wi-Fi: Use the Blink app to link your camera. Follow the on-screen steps.
Below is a comparison of mounting surfaces:
| Surface | Difficulty | Recommended Tools |
|---|---|---|
| Wood | Easy | Screwdriver |
| Brick | Medium | Drill (masonry bit) |
| Metal | Hard | Drill (special bit) |
Practical Tips And Common Mistakes
- Always double-check Wi-Fi strength before mounting. Poor signal causes delayed alerts.
- Avoid mounting too high or too low; you may miss faces or packages.
- If you rent, use adhesive strips instead of screws to avoid wall damage.
Many users skip testing their camera angle before final installation. Place the camera temporarily and check the view in the Blink app.
Credit: www.youtube.com
Frequently Asked Questions
How Long Does Blink Doorbell Camera Installation Take?
Most people finish in 20–30 minutes. Setup may be longer for brick walls or weak Wi-Fi.
Can I Mount The Camera Without Screws?
Yes, you can use adhesive strips or mounts, but screws are more secure.
Does The Blink Doorbell Camera Work In Extreme Weather?
It’s weather-resistant, but heavy rain or snow may reduce performance. A small awning can help.
Is Professional Installation Necessary?
No, most users install it themselves. Only call a professional if you have complex wiring or surfaces.
What Should I Do If My Camera Has No Signal?
Move your Wi-Fi router closer or add a Wi-Fi extender. For more tips, visit the Blink Support Center.
Mounting your Blink Doorbell Camera is simple and boosts your home’s safety. Take time to pick the best location, test angles, and follow the steps. With careful setup, you’ll enjoy reliable alerts and clear video for years.