Capturing great photos often means dealing with tricky light, reflections, or color. This is where lens filters come in. They attach to your camera’s lens and help you control how light enters, letting you solve problems or get creative effects. Knowing when to use each filter can turn ordinary shots into memorable images.
Table of Contents
Common Types Of Lens Filters And When To Use Them
Polarizing Filters
A polarizing filter is a favorite for landscape photographers. It cuts glare from water, glass, and leaves, making colors richer and skies deeper blue. Use it on sunny days to reduce haze and boost contrast. However, avoid using it with ultra-wide lenses, as the effect can look uneven in the sky.
Nd (neutral Density) Filters
An ND filter darkens the scene without changing color. It’s essential for:
- Long exposures: Blurring waterfalls, rivers, or clouds in daylight.
- Wide apertures: Shooting portraits in bright sun with soft backgrounds.
ND filters come in different strengths. The number (like ND8, ND64) shows how much light they block.
Graduated Nd Filters
A graduated ND filter is darker at the top and clear at the bottom. This helps balance bright skies with darker ground, especially at sunrise or sunset. It saves time compared to editing later, but only works best when the horizon is straight.
Uv Filters
UV filters were once used to block ultraviolet light on film cameras. Today, most people use them to protect the lens from dust, scratches, and moisture. They have little effect on digital image quality, but are cheap insurance for your lens.
Special Effect Filters
Some filters create unique looks:
- Color filters: Change the mood or fix color casts.
- Soft focus: Add a dreamy blur for portraits.
- Star filters: Turn lights into starbursts at night.
Most effects can be made in editing software, but using a filter can save time or give a more natural look.
Comparison Of Filter Types
Here’s a quick look at how different filters affect your photos:
| Filter Type | Main Use | Effect on Image |
|---|---|---|
| Polarizing | Landscapes, reduce glare | Richer colors, less reflection |
| ND | Long exposure | Motion blur, controls brightness |
| Graduated ND | Sunrise/sunset | Balances sky and ground |
| UV | Lens protection | Minimal effect |

Credit: www.exposureguide.com
When To Skip Filters
Sometimes, it’s better not to use a filter:
- In low light, filters can make images darker or softer.
- Cheap filters may reduce sharpness or cause flare.
- Some modern lenses have coatings that do what UV or polarizers once did.
Non-obvious Tips
- Stacking filters can cause vignetting (dark corners). Use slim filters with wide lenses.
- Clean filters regularly—smudges show up in bright conditions.
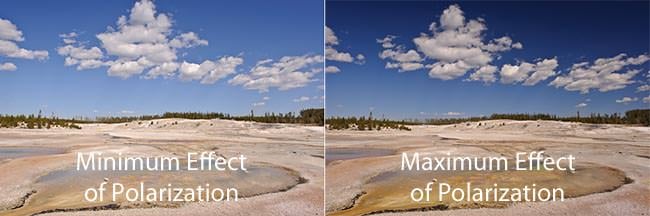
Credit: caravelselect.com
Frequently Asked Questions
What’s The Main Difference Between Nd And Polarizing Filters?
ND filters reduce all light equally; polarizers cut glare and make colors pop.
Can I Use Filters On My Smartphone?
Yes, clip-on or screw-in filters are made for many phones, but check compatibility.
Do I Need A Uv Filter For Digital Cameras?
Not for image quality, but it can protect your lens from damage.
How Do I Choose The Right Nd Filter Strength?
Start with ND8 for mild blur, ND64 or higher for heavy blur in bright light.
Is It Better To Edit Or Use Real Filters?
Editing is flexible, but real filters give more natural results in-camera. For more details, see Wikipedia’s guide to photographic filters.
Choosing the right filter isn’t just about gear—it’s about knowing your scene and your creative goal. With the right filter and a bit of practice, your photos will stand out, even in tricky lighting.