Photography often faces one big challenge: lighting. Sometimes, the sun is too bright, or shadows hide important details in your subject’s face. This is where fill flash comes in. It’s a simple tool, but it can make a huge difference in your photos. Many beginners miss how powerful fill flash is, and how it can turn dull pictures into clear, professional-looking images.
Table of Contents
What Is Fill Flash?
Fill flash is a camera technique that uses a burst of light to brighten shadows. Unlike regular flash, fill flash is not meant to light up the whole scene. Instead, it adds light to just the dark areas, balancing the exposure. This helps when you take pictures outdoors in bright sunlight or when your subject is backlit.
When you use fill flash, your camera fires a flash even if there is enough light. The goal is to “fill” the shadowy parts, so details are visible. For example, if you photograph a person on a sunny day, their face might be dark because of strong shadows.
Fill flash fixes this problem.
How Fill Flash Improves Photos
Using fill flash can make your images look more natural. Here’s how:
- Reduces harsh shadows – Shadows under eyes or the chin disappear.
- Brings out details – Faces and objects become clearer.
- Balances exposure – The background and foreground are both well-lit.
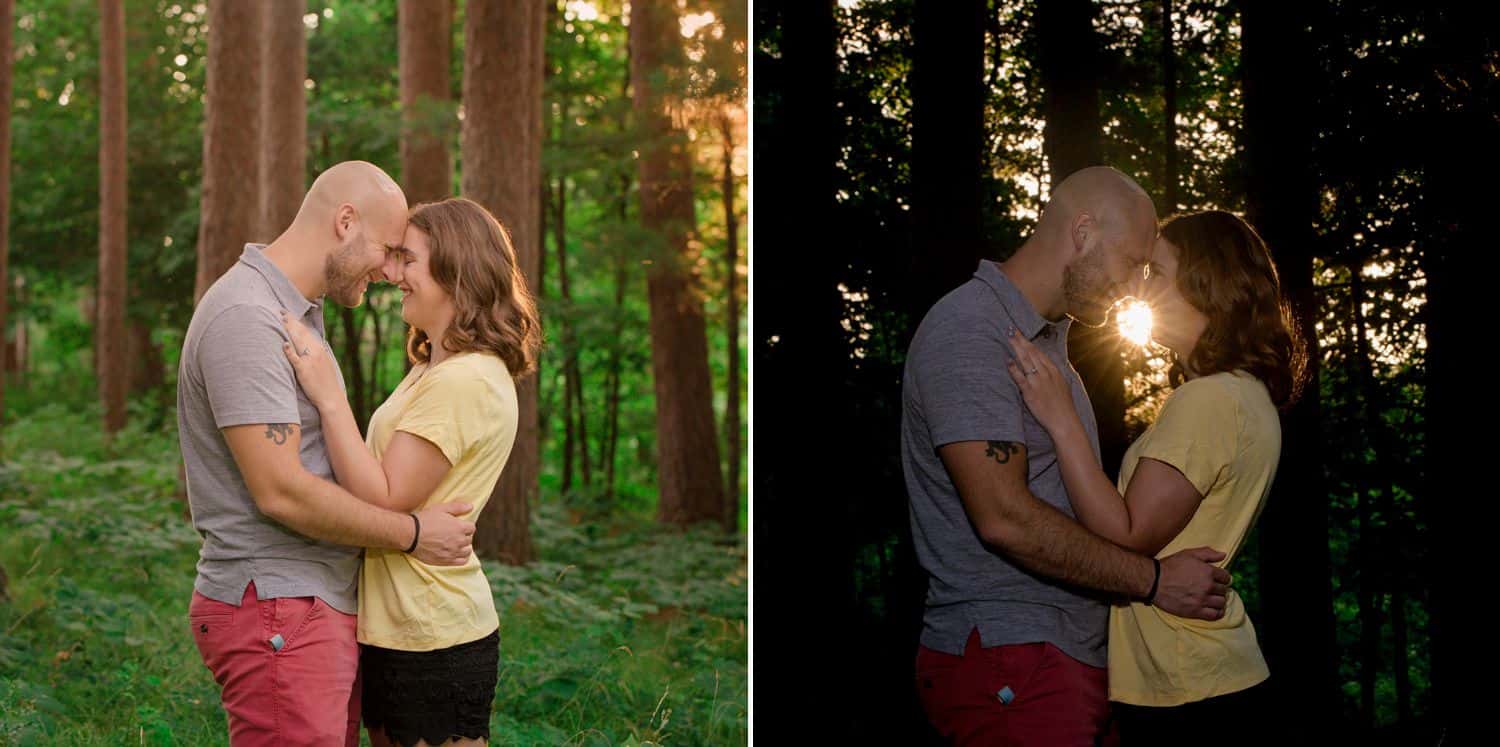
Consider this comparison:
| Without Fill Flash | With Fill Flash |
|---|---|
| Subject’s face is dark, details lost | Face is bright, details visible |
| Background too bright | Even lighting between subject and background |
Many beginners overlook how fill flash can fix “dull” photos. Sometimes, they think flash is only for dark rooms. But fill flash is useful even in daylight.
Credit: www.shootproof.com
When To Use Fill Flash
You don’t need fill flash for every picture. Here are the best times to use it:
- Outdoor portraits on sunny days
- Backlit scenes (subject is in front of a bright window)
- Group photos with uneven lighting
- Macro shots (flowers, insects) with shadows
A quick tip: If your camera has a fill flash mode, try it when faces look too dark. You’ll notice an immediate difference.
Here’s a simple comparison of camera settings:
| Setting | Fill Flash Needed? |
|---|---|
| Indoor, low light | No, use regular flash |
| Outdoor, sunny, strong shadows | Yes, use fill flash |
| Backlit subject | Yes, use fill flash |
Common Fill Flash Mistakes
Even experienced photographers make mistakes with fill flash. Here are two important ones:
- Using fill flash too close – This can make faces look flat and unnatural.
- Forgetting to adjust flash power – Too much flash washes out colors.
If your camera allows, reduce flash power for softer light. Some cameras have a “flash compensation” feature for this.
For more technical details, see Wikipedia.

Credit: www.youtube.com
Frequently Asked Questions
What Is The Difference Between Fill Flash And Regular Flash?
Fill flash adds light to shadows, while regular flash lights up the whole scene.
Can I Use Fill Flash In Automatic Mode?
Yes, most cameras use fill flash automatically in certain situations, but manual mode gives more control.
Will Fill Flash Drain My Battery Quickly?
A small burst of flash uses less power than full flash, but it still affects battery life.
Is Fill Flash Only For Portraits?
No, fill flash helps in many situations like macro photography and group photos.
How Can I Avoid Harsh Results With Fill Flash?
Move the flash away from the subject or use flash compensation to reduce power.
Fill flash is a simple tool, but it makes photos look more professional. Try it next time you see strong shadows, and you’ll see how much your images improve.