Removing your Nanit camera from its wall mount may seem tricky at first, but with the right steps, you can do it safely in just a few minutes. Whether you want to reposition the camera, clean it, or move it to a new nursery, making sure you don’t damage the mount or camera is important.
Many parents worry about breaking the mount or leaving marks on the wall, but careful handling prevents most common issues. This guide will walk you through the process, highlight useful tips, and answer frequent questions.
Table of Contents
Preparing To Remove Your Nanit Camera
Before you start, make sure you have the correct tools and a safe environment. The Nanit wall mount is designed to keep the camera stable, so removing it needs gentle force and precision.
- Turn off the camera and unplug it from the power source.
- Clear the area around the wall mount for easy access.
- Have a Phillips screwdriver ready, as most Nanit mounts use Phillips screws.
- Place a soft cloth or mat under the camera in case it drops.
Step-by-step Guide To Removing The Camera
Follow these steps to safely remove your Nanit camera from its wall mount:
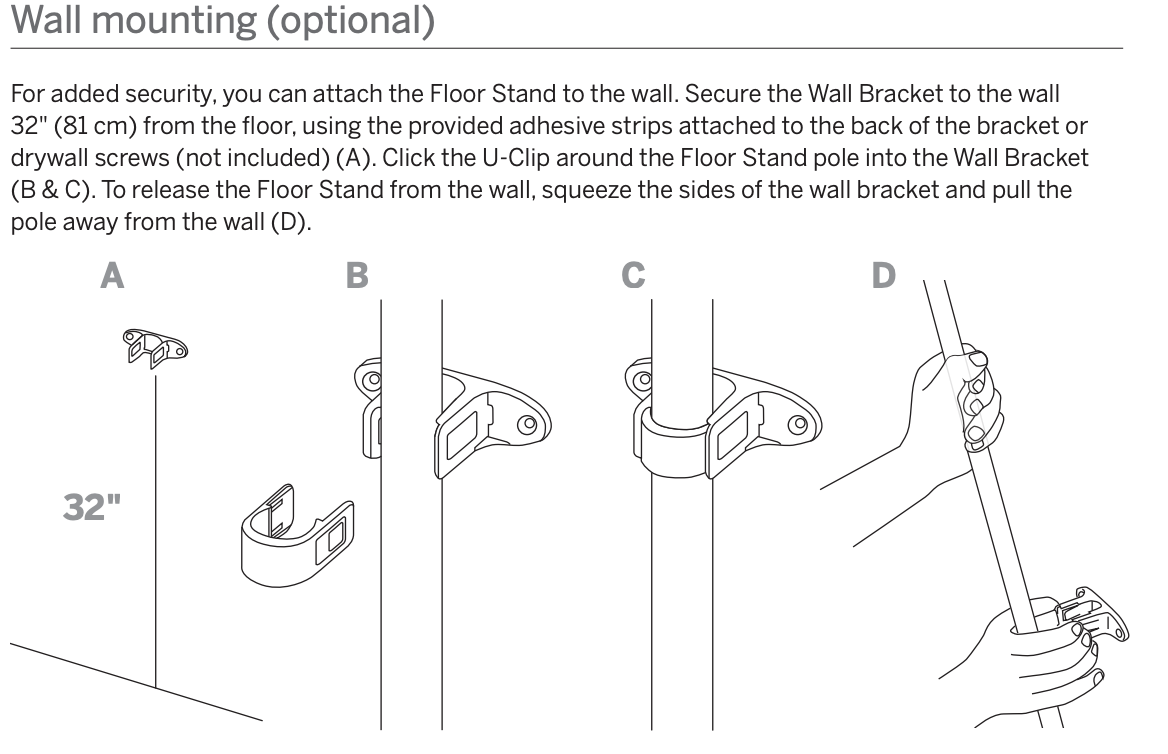
- Unclip the camera: Gently press the release button or tab on the mount. Pull the camera unit out and set it aside.
- Remove cable clips: If your mount uses cable clips, carefully detach them from the wall, starting from the camera end.
- Unscrew the mount: Use your Phillips screwdriver to loosen each screw. Hold the mount with one hand to prevent sudden movement.
- Lift the mount off: Once unscrewed, slowly remove the mount from the wall. If you feel resistance, double-check for hidden screws or adhesive pads.
Common Mistakes To Avoid
- Forcing the camera: Avoid twisting or pulling too hard, which can break the camera or mount.
- Forgetting hidden screws: Some mounts have extra screws under cable covers or decorative panels.
- Ignoring adhesives: If your mount uses adhesive pads, slide a plastic card between the pad and wall to separate gently.
Credit: support.nanit.com
Comparison: Nanit Wall Mount Vs. Floor Stand
If you’re considering changing your setup, here’s a quick comparison:
| Feature | Wall Mount | Floor Stand |
|---|---|---|
| Installation | Requires screws, wall drilling | No drilling, portable |
| Stability | Very stable | Stable, but can be moved easily |
| Removal | Needs tools | No tools needed |
Wall Mount Removal: Screw Types
Knowing which screws are used helps you prepare. Most Nanit wall mounts use Phillips screws, but some models may differ.
| Model | Screw Type | Quantity |
|---|---|---|
| Nanit Pro | Phillips | 2 |
| Nanit Plus | Phillips | 3 |
| Nanit Original | Torx | 2 |

Credit: www.youtube.com
Tips For Protecting Your Wall
After removal, check for any marks or holes. Use wall filler for small holes and touch-up paint to restore the surface. Avoid reusing old adhesive pads, as they lose stickiness and may damage paint.
If you need more detailed info, visit the official Nanit support page: Nanit Support.
Removing your Nanit camera is simple if you follow these steps and handle every part gently. Always keep your tools nearby and check for hidden screws or adhesives. With proper care, you’ll protect your camera, mount, and wall, making future changes easy.
Frequently Asked Questions
How Long Does It Take To Remove A Nanit Camera?
Usually 5–10 minutes if you have the right tools and follow the steps.
Can I Reuse The Wall Mount After Removal?
Yes, but only if the mount and screws are not damaged. Avoid reusing adhesive pads.
Will Removing The Mount Damage My Wall?
Minor holes or marks may appear. Fill holes and repaint for best results.
Do I Need Professional Help For Removal?
No, most people can remove the mount themselves. Professional help is only needed if the mount is stuck.
What Should I Do With Leftover Parts?
Store them safely for future use or recycle according to local guidelines.
Credit: support.nanit.com