Building a stable camera shot at home can be easier than you think. Many videos look shaky because hands naturally move, especially when walking. Buying a professional stabilizer is expensive, but with a few tools, you can create a DIY camera stabilizer that works surprisingly well. Let’s dive into how you can make your own, what you’ll need, and how this simple tool can boost your filming quality.
Table of Contents
What You Need To Build A Camera Stabilizer
To keep your camera steady, you need materials that are easy to find and affordable. For this basic design, gather:
- 1 metal or PVC pipe (about 1–2 feet long)
- 2 pipe end caps
- 1 standard tripod screw (¼ inch)
- Weights (washers or small sandbags)
- Electrical tape or foam grip
- Drill and screwdriver
This setup is perfect for smartphones and small cameras.
Step-by-step Guide To Making Your Stabilizer
- Prepare the Pipe: Cut your pipe to a comfortable length (about the width of your chest). Smooth any sharp edges.
- Attach the Tripod Screw: Drill a hole in the center of one end cap. Insert the tripod screw and secure it, so your camera can mount firmly.
- Add the Weights: Place washers or sandbags inside the other end cap. The weight helps balance your camera and absorb shakes.
- Assemble: Attach both end caps to the pipe. Make sure the screw is on top.
- Add a Grip: Wrap tape or foam around the middle of the pipe. This gives you a soft, non-slip handle.
- Mount Your Camera: Screw your camera onto the top. Adjust the weights if the stabilizer tips too much to one side.
Now, you’re ready to shoot smoother videos with just a homemade tool!
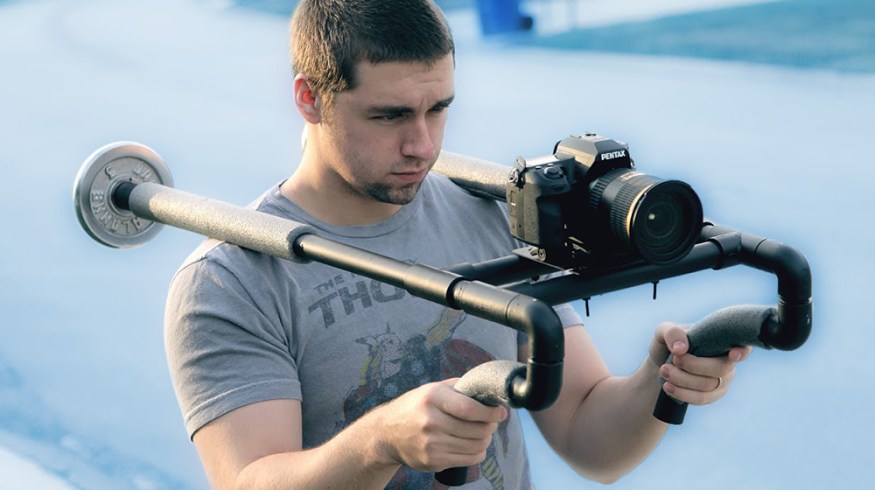
Credit: maryheylema.nl
How Does A Diy Stabilizer Compare?
Here’s a quick look at the differences between a DIY stabilizer and store-bought models:
| Feature | DIY Stabilizer | Commercial Stabilizer |
|---|---|---|
| Cost | $5–$15 | $80–$300+ |
| Setup Time | 1–2 hours | Ready out of box |
| Customization | High | Low–Medium |
Tips For Better Video Stability
- Hold the grip lightly to let the stabilizer move naturally.
- Walk smoothly with bent knees to reduce up-and-down motion.
- Practice—the more you use your DIY stabilizer, the better the results.

Credit: diycozyhome.com
Real-world Example: Homemade Vs Handheld
Consider this short comparison:
| Scenario | Handheld Footage | DIY Stabilizer Footage |
|---|---|---|
| Walking Indoors | Shaky, uneven | Smoother, more professional |
| Panning Shots | Jerky movements | Fluid transitions |
Many beginners miss that the weight at the bottom is crucial—it acts as a counterbalance, helping to absorb quick movements. Also, using a foam grip isn’t just for comfort; it reduces sweat and accidental slips.
If you want more advanced stabilizer ideas, you can check out designs on Wikipedia.
Frequently Asked Questions
What Types Of Cameras Can This Stabilizer Support?
It works best with smartphones and small digital cameras. Larger cameras may need stronger materials and more weight.
Is It Safe For Expensive Cameras?
As long as the tripod screw is tight and the stabilizer is well-built, it’s safe for most small cameras.
How Much Does It Cost To Build?
Most people spend $5–$15 using basic hardware store items.
Can I Use Different Materials?
Yes! PVC, aluminum, or even wood can be used. Just make sure the stabilizer is strong and well-balanced.
How Long Does It Take To Make?
Usually, 1–2 hours if you have the tools ready. It’s a quick weekend project with big benefits for your videos.
With this simple guide, you can make your own camera stabilizer at home and start creating more professional-looking videos right away.

Credit: www.youtube.com