A camera obscura is a simple device. It projects an image onto a surface.
Making one is easier than you think. This ancient invention fascinates artists and photographers alike. It’s a tool that shows the magic of light and shadow. With just a few materials, you can create your own. Dive into the world of optics and creativity.
A camera obscura lets you see the world differently. It transforms a room into a giant camera. This technique has inspired great minds for centuries. Ready to explore this intriguing concept? Let’s discover how you can craft a camera obscura at home. It’s a fun and educational project. Perfect for curious minds and budding artists.
Table of Contents
Introduction To Camera Obscura
The camera obscura is a simple device. It uses a small hole to project images onto a surface. Ancient times saw its use for viewing eclipses. Artists used it to trace scenes and create art. The camera obscura helped develop modern cameras. It is the base of how cameras work today. Light passes through a hole, creating a picture. This idea changed the way people see the world.
Long ago, people were amazed by camera obscura. It showed how light and shadows work. Famous thinkers like Aristotle spoke about it. Artists made detailed paintings using camera obscura. It helped them draw things from real life. This tool was important for learning and creating. It was the beginning of photography. The idea spread from one person to another. It became known everywhere.
Today, camera obscura is used for fun and learning. Schools use it to teach about light. People make small versions at home. It helps understand how cameras capture images. Some museums have large camera obscuras. Visitors can see the world upside down. It’s amazing and entertaining. Camera obscura inspires new ideas in art and science. It shows the beauty of simple technology.
Credit: blackcreek.ca
Materials Needed
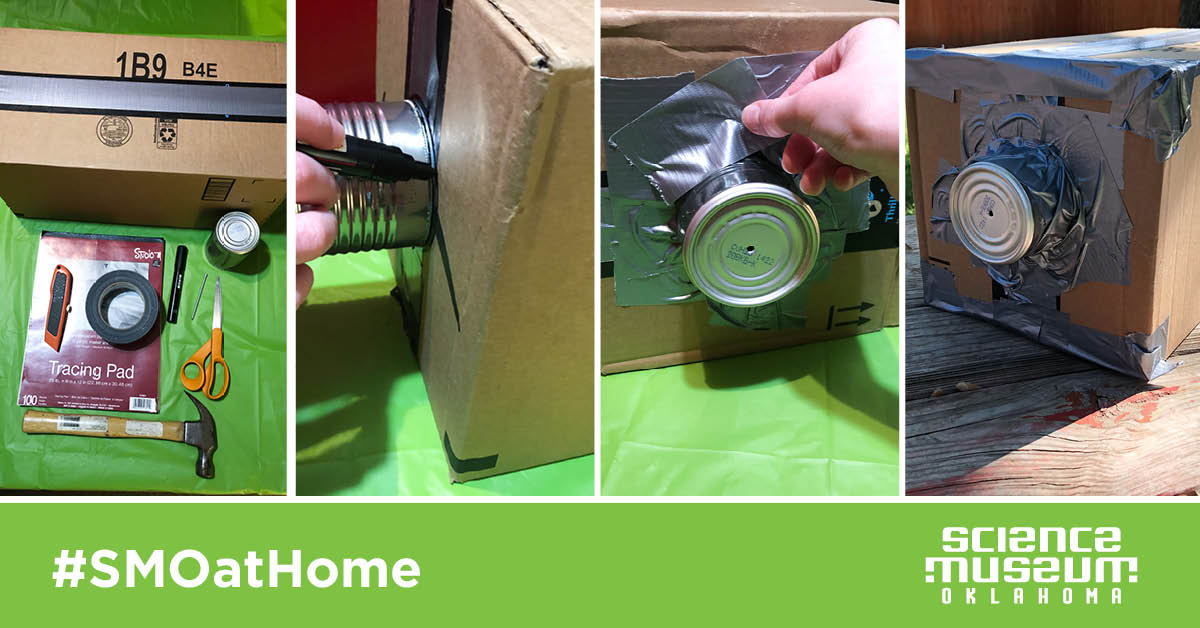
To create a camera obscura, gather a cardboard box, scissors, tape, aluminum foil, and a small pin. A piece of white paper and a dark cloth are also essential. These simple materials help you make a basic camera obscura at home.
Basic Supplies
A cardboard box is essential. Choose one that is sturdy. You need a small mirror. It should fit inside the box. A magnifying glass is vital. This helps focus the image. You require black tape. This seals light leaks. Gather a piece of white paper. It acts as a screen. A sharp knife or scissors are necessary. They cut holes in the box. Lastly, have a ruler handy. It ensures accurate measurements.
Optional Enhancements
Consider using a black cloth. It covers the box edges. This reduces extra light. A tripod is helpful. It stabilizes the camera obscura. Add a lens for better focus. It improves image clarity. Use a colored gel. This changes the light color. Lastly, try a digital screen. It captures and displays images.
Preparing Your Workspace
A good spot is important for your camera obscura. Pick a room with one window. This helps control light. A small window is best. Cover it with dark fabric. Make sure it is secure. This stops extra light. The room should be dark. This helps the image show clearly. Clear images need less light. The window is your camera lens.
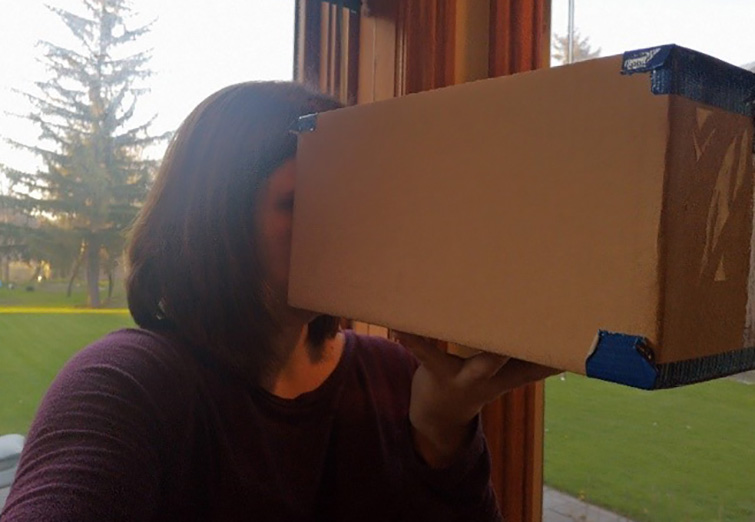
Gather the right tools before starting. You need a cardboard box. A shoebox works well. Also, get black tape, scissors, and foil. Use a pin to make a small hole in the foil. This is your pinhole. Place the foil over the window hole. Tape it securely. Make sure no light leaks. A white paper helps. Place it inside the box. This catches the image. You now have your simple camera.

Credit: www.youtube.com
Building The Box
Choose a sturdy box that is big enough for your project. A shoe box or cereal box works well. Make sure the box can close tightly. This will help keep out unwanted light. The box should not have any holes. If there are holes, cover them with tape. A dark box is the best choice. It helps make the image clear. You can paint the box black inside. This will improve the image quality. Black paint absorbs light, which is good for the project.
Cut a small hole in one side of the box. The hole should be round. It should be about the size of a coin. Use tracing paper for the screen. Tape the tracing paper inside the box. It should be opposite the hole you made. This paper will show the image. Make sure the paper is smooth. Wrinkles can ruin the image. A smooth screen gives a clear picture. This step is very important.
Pinhole Creation
Finding the right spot for your pinhole is crucial. The spot must be on a flat surface. It should not be too thick. A thin material works best. This allows light to pass through. Use a sharp tool to make the hole. A needle or pin is ideal. Be careful not to make the hole too big. A small hole gives a clearer image.
Ensuring precision is the next step. Make sure the hole is round. An uneven hole can blur the image. Use sandpaper to smooth the edges. Check the hole by looking through it. Light should pass evenly. If not, adjust and check again. A perfect hole creates the best picture.
Assembling The Camera
Attaching Components is simple. First, find a box. The box should be sturdy. Cut a small hole in one side. This hole lets light enter. Then, attach a lens or magnifying glass. The lens should cover the hole. Tape it securely. Inside the box, attach a white paper. The paper should face the lens. This paper catches the image.
Testing Light Entry is important. Take the box outside. Point the lens at something bright. Look inside the box. You should see an image. If not, check the hole. Make sure it’s not blocked. Adjust the lens if needed. Try again. The image should appear clear. If the image is blurry, adjust the lens. This helps focus the light.
Enhancing The Experience
Crafting a camera obscura involves a few simple materials. Begin with a dark box and a small hole to let light in. Watch as the scene outside projects inside, offering a fascinating glimpse into early photography techniques.
Adding Lenses
Adding a lens to your camera obscura makes images clearer. A convex lens bends light better. You can see more details with it. Place the lens in front of the pinhole. Secure it well to prevent falling. This setup improves the image quality.
Improving Visibility
Brighten the screen for better visibility. Use a white surface for projection. It reflects light better. Adjust the room’s light; darker rooms show images clearer. Control light entering the camera. Cover any gaps around the lens. This reduces unwanted light. Your image becomes sharp and easy to see.
Using Your Camera Obscura
Place your camera obscura in a bright room. Let the light come through the small hole. It will create an image inside the box. Make sure the surface inside is white. This helps the image show clearly. You might need to adjust the box. Experiment with different light conditions. Try to capture shadows and highlights. It makes the image interesting.
Change the angle of your box. This changes the view inside. Try tilting it up or down. Move the box left or right. See how the image changes. Each angle gives a new perspective. You can discover fun and creative views. Remember, patience is key. Enjoy your artistic journey!
Troubleshooting Common Issues
Creating a camera obscura involves using a dark box or room with a small hole. Light passes through this hole, projecting an inverted image on the opposite surface. Adjust the hole size to improve clarity and brightness, ensuring a fascinating visual experience.
Light Leaks
Light leaks can spoil your pictures. Check if the box is sealed. Use tape to cover any gaps. Keep it dark inside. Test with a flashlight. Look for any light spots. Fix them immediately. Ensure no holes in the box. Use a dark curtain to block extra light. This helps a lot. Proper sealing is key. It gives clearer pictures.
Blurry Images
Blurry images are disappointing. Focus is important. Adjust the lens carefully. Keep it steady. Use a tripod if you can. Check the distance to the screen. Too close can blur images. Too far can also cause blur. Find the right spot. Clean the lens often. Dust can affect images. Sharp images need clean lenses.
Credit: www.sciencemuseumok.org
Exploring Creative Uses
Building a camera obscura involves simple materials and a darkened room. A small hole lets light in, projecting an inverted image onto a surface inside. This ancient technique offers a fascinating glimpse into early photography methods, showcasing the magic of light and perspective.
Artistic Projects
A camera obscura is a simple device. It uses light and shadows. Artists love it for projects. Shapes and forms appear in a new way. Create unique artworks with it. Photographers use it to explore light. Painters can trace images. It makes art fun and creative. Drawing becomes different. Use it for inspiration. It changes how you see things. It’s great for trying new styles. Artists find new ideas with it. Experiment with colors and light.
Educational Purposes
Teachers use camera obscura in class. It helps students learn about light. They see how images form. Science classes use it for experiments. It shows the basics of cameras. History lessons use it too. It’s an old tool with a story. Kids love seeing its magic. Teachers find it useful. It helps explain complex ideas. Visual learning is effective. Use it to teach simple concepts.
Frequently Asked Questions
How To Make A Simple Camera Obscura?
Create a camera obscura using a cardboard box and a pinhole. Cut a small hole in one side. Cover the hole with aluminum foil and pierce it with a pin. Place a white paper inside opposite the pinhole. Seal the box and view images projected through the pinhole.
What Equipment Do You Need To Make A Camera Obscura?
To create a camera obscura, you’ll need a dark room or box, a small hole, and a white surface. Ensure the hole is opposite the surface for image projection. Use a lens for sharper images, if desired. These simple tools can transform spaces into fascinating optical devices.
What Is The Procedure Of Camera Obscura?
Camera obscura uses a darkened room or box with a small hole. Light enters through the hole, projecting an inverted image on the opposite surface. This technique demonstrates the basic principles of optics and photography. It’s a simple yet effective way to understand how light forms images.
Can You Make A Camera Obscura Without A Lens?
Yes, you can create a camera obscura without a lens. Simply use a small pinhole in a dark room. Light passes through the pinhole, projecting an inverted image on the opposite wall. This simple setup demonstrates the basic principles of photography.
Conclusion
Creating a camera obscura can be a fun project. It’s simple and educational. You only need a few materials. Cardboard, tape, and a small lens. Follow the steps carefully. Watch how light creates an image. It’s like magic. Kids and adults alike will enjoy it.
You learn about light and photography. Plus, it’s a great hands-on activity. Capture the wonder of early image-making. Try it today. You’ll gain new appreciation for cameras. This project connects you to the history of photography. Explore, learn, and share the experience.
Enjoy the world through a new lens.