Manual mode on a camera gives you full control. You decide the settings for each shot.
Understanding how to use manual mode can improve your photography skills greatly. It allows you to adjust aperture, shutter speed, and ISO to capture perfect moments. Many photographers find manual mode daunting at first. But once you get the hang of it, you’ll enjoy the flexibility it provides.
You can experiment with light and shadows. You can create stunning effects. This guide will help you understand the basics of manual mode. You’ll learn how to adjust settings for different scenarios. Get ready to explore your camera’s capabilities. Let’s dive into how manual mode can transform your photography experience.

Credit: digital-photography-school.com
Table of Contents
Introduction To Manual Mode
Manual mode gives control to the photographer. You adjust settings yourself. It helps you learn about your camera. You can change the aperture, shutter speed, and ISO. This mode lets you be creative. You can take photos in different lighting. Manual mode is great for learning photography. It makes you understand how light works. You see how each setting affects the picture. It is perfect for artistic shots.
Manual mode gives freedom to create. You can choose your settings. This helps capture unique images. It teaches you about light and exposure. You get to know your camera better. You can shoot in low or bright light. It allows for creative control. You can make your photos look special. Manual mode is perfect for learning and experimenting.
Manual mode gives full control. Auto mode decides for you. In auto, the camera picks settings. It chooses aperture, shutter speed, and ISO. Manual lets you choose these. Auto is quicker but less creative. Manual allows for artistic choices. You can change settings for each shot. Auto is easy, but manual teaches you more.
Credit: foodwithfeeling.com
Understanding Camera Settings
ISO helps your camera see better in different lights. Low ISO is good for sunny days. High ISO is better for dark places. High ISO can make photos look grainy. Choose ISO wisely. Keep it low for clear pictures.
Shutter speed controls how long the camera sees light. Fast speed freezes action. Slow speed can blur movement. Use fast speed for sports. Use slow speed for night shots. Adjust speed for clear images. Be mindful of light changes.
Mastering Aperture Settings
Aperture is a hole in the camera lens. It lets light in. Depth of field is how much of the scene is in focus. A small hole gives a large depth. Everything looks sharp. A big hole gives a small depth. Only part of the scene is sharp.
To blur the background, choose a big hole. This makes the subject pop. For landscapes, use a small hole. This keeps everything clear. Experiment to find the best look. Practice makes perfect.
Balancing Exposure
The exposure triangle is key in photography. It has three parts: aperture, shutter speed, and ISO. Each part controls light in your photo. Aperture is like the camera’s eye. It decides how much light enters. Shutter speed is the blink. It decides how long light stays in. ISO is the camera’s sensitivity. A lower number means less light sensitivity.
Balancing these three is essential. Too much light makes photos bright. Too little makes them dark. Practice makes perfect. Play with settings. Find what works best.
Sometimes, photos are too dark or bright. Exposure compensation helps fix this. It adjusts the brightness. Use it when auto settings aren’t right. Look for a plus or minus button on your camera. Turn it up to make photos brighter. Turn it down to darken them. Be gentle with changes. Small steps can make a big difference. Check your photos often. Adjust as needed.
Focusing Techniques
Cameras offer two main focus options: manual and auto. In auto focus, the camera picks the focus point for you. This is fast and easy for beginners. Manual focus lets you choose where to focus. This is great for creative shots.
Getting a sharp focus is key in photography. Use a tripod to keep the camera steady. Adjust the lens until the picture looks clear. Zoom in on the subject to make sure it’s sharp. Check the focus by taking test shots. Review them on the camera’s screen.
Creative Control With Manual Mode
Using manual mode lets you control motion blur. Adjust the shutter speed to make moving objects sharp or blurry. A fast shutter speed freezes motion. A slow shutter speed shows motion blur. You can capture a car speeding by. Or show a waterfall’s soft flow. Experiment with different speeds. Try to find the right balance. This helps create interesting photos. Mastering motion blur gives your images life. It adds creativity and fun.
Manual mode helps create beautiful bokeh effects. Adjust the aperture to change the depth of field. A wide aperture makes the background blurry. This focuses on your subject. Bokeh adds charm to portraits and close-ups. It makes the image feel dreamy. Use a low f-number for more blur. Experiment with different lenses. Each lens gives a unique bokeh style. Bokeh makes photos artistic and elegant. It’s fun to see your subject pop. Enjoy the magic of manual mode.
Troubleshooting Common Issues
Explore manual mode on your camera to control settings like shutter speed, aperture, and ISO. Adjust these elements to achieve the perfect lighting and focus for your photos. Practice makes perfect, so experiment with different combinations to improve your photography skills.
Dealing With Overexposure
Overexposure can make photos too bright. Adjusting the aperture can help. A higher f-stop number reduces light. Shutter speed is also important. A faster speed lets in less light. Lowering the ISO can reduce brightness too. ISO measures camera’s sensitivity to light. Keep it as low as possible. Experiment with these settings. Find what works best for your shot.
Handling Low Light Conditions
Low light can be tricky for photos. Open the aperture wider to let in more light. Use a lower f-stop number. Increase the ISO for more sensitivity. But watch for noise. Slow down the shutter speed. More time lets in more light. Use a tripod to keep the camera steady. Practice these techniques to improve in low light.

Credit: photographyconcentrate.com
Tips For Practicing Manual Mode
Try changing the aperture setting. It controls light and focus. A smaller number lets in more light. It also blurs the background. Change the shutter speed too. A fast speed freezes action. A slow speed shows motion. Adjust the ISO setting as well. Higher ISO helps in low light. But it can make photos grainy. Keep practicing with each setting. Watch how they change your photos.
Mistakes help you learn. Check your photos often. Are they too bright or dark? Adjust your settings. Try again. Did you miss focus? Adjust the aperture. Make notes of what went wrong. And what you did to fix it. This will help you improve. Don’t be afraid to try new things. That’s how you learn best.
Advanced Techniques
Landscape photography loves manual mode. Control the camera’s settings fully. Adjust the aperture to change depth. Make backgrounds sharp or blurry. Shutter speed affects light. Fast speeds catch motion. Slow speeds add light. ISO settings change sensitivity. Low ISO for bright days. High ISO for dark times. Play with settings. Find what works best.
Portrait photography needs detail. Use manual mode for control. Adjust the aperture to focus on faces. Blurred backgrounds look great. Shutter speed keeps movement clear. Fast speeds freeze action. ISO changes light sensitivity. Low ISO for sunny days. High ISO for dim light. Try different settings. Capture the perfect shot.
Conclusion And Next Steps
Building confidence in manual mode is a journey. Start by taking small steps. Practice with simple subjects. As you progress, try shooting in different lights. This helps you learn how light affects photos. Don’t be afraid to make mistakes. Mistakes are great teachers.
Review your photos often. Look for patterns in what works and what doesn’t. This builds your confidence. Soon, you’ll feel more at ease with manual settings. Remember, every photographer started as a beginner.
Exploring new photography genres can be exciting. Try landscape photography. Capture the beauty of nature. Or, experiment with portrait photography. Focus on people’s expressions. Each genre has its own challenges. Learn one genre at a time. This keeps photography fun and interesting. Always stay curious and keep learning. Your skills will grow with each photo you take.
Frequently Asked Questions
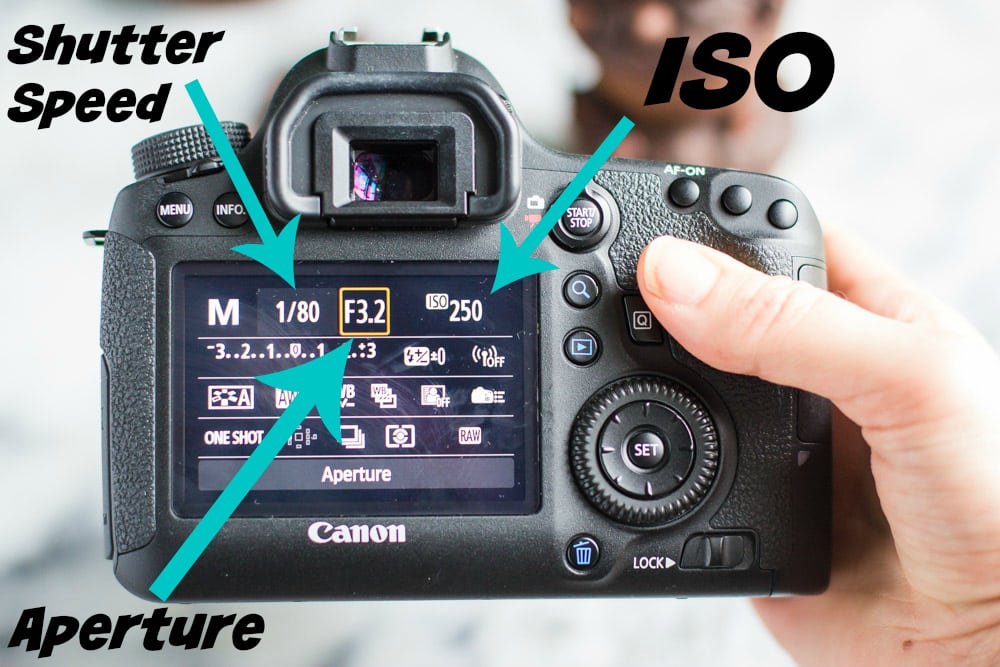
How To Use Manual Settings On A Canon Camera?
Access manual mode by turning the mode dial to “M”. Adjust shutter speed, aperture, and ISO using the control wheels. Use the LCD screen or viewfinder to check exposure. Experiment for desired results.
How Does A Manual Camera Work?
A manual camera functions through user-controlled settings. Adjust shutter speed, aperture, and ISO manually. This allows precise exposure control. The user focuses the lens and composes the shot. The camera captures the image onto film or a digital sensor. Manual cameras offer creative flexibility for photographers.
How To Use Manual Mode In Iphone Camera?
Open the Camera app, tap “Pro” mode to access manual settings. Adjust ISO, shutter speed, and focus manually for desired results.
What Should I Set First In Manual Mode?
Begin by setting the ISO for desired light sensitivity. Next, adjust aperture for depth of field. Finally, set shutter speed to control motion blur. Experiment with these settings to achieve the best exposure.
Conclusion
Exploring manual mode enhances your photography skills. Control each shot with precision. Adjust settings for the best results. Experiment with ISO and shutter speed. Learn to balance light and dark. Capture unique moments with confidence. Practice makes perfect, so keep shooting.
Don’t fear mistakes; they are learning steps. Enjoy the creative freedom manual mode provides. You’ll see improvement with each photo taken. Photography becomes more rewarding as you master manual mode. Embrace the challenge and grow your talent. Keep your camera handy and continue exploring new angles.
Your journey in photography is just beginning.