A camera bean bag is simple to make. It’s a versatile tool for photographers.
You don’t need fancy materials. Just a few items can create this useful accessory. A camera bean bag helps stabilize your camera. It reduces shakes and improves image quality. Unlike tripods, it’s lightweight and easy to carry. You can use it on uneven surfaces.
Whether you’re shooting wildlife or landscapes, a bean bag can be a handy companion. Making one is a fun project. It doesn’t require sewing skills. You just need some fabric, filling, and a bit of creativity. In this guide, we’ll walk you through the steps to make your own camera bean bag. Get ready to enhance your photography with this simple, homemade tool!
Table of Contents
Materials Needed
Creating a camera bean bag is fun. You need some key supplies. First, you need fabric. Choose fabric that is strong. It must hold the weight of your camera. Beans or rice are next. These fill the bean bag. Choose ones that are small. They help the bean bag mold to the camera shape. Thread and a needle are also needed. They will stitch the fabric together. Make sure to use strong thread. Scissors are important too. They cut fabric into the right size.
Some extras can make the bean bag better. Velcro strips can be added. They help keep the camera stable. Handles are useful. They make carrying easy. You can use a piece of fabric to make handles. Extra padding can be added. It protects the camera from bumps. Decorative patches make it look nice. Choose patches that show your style.

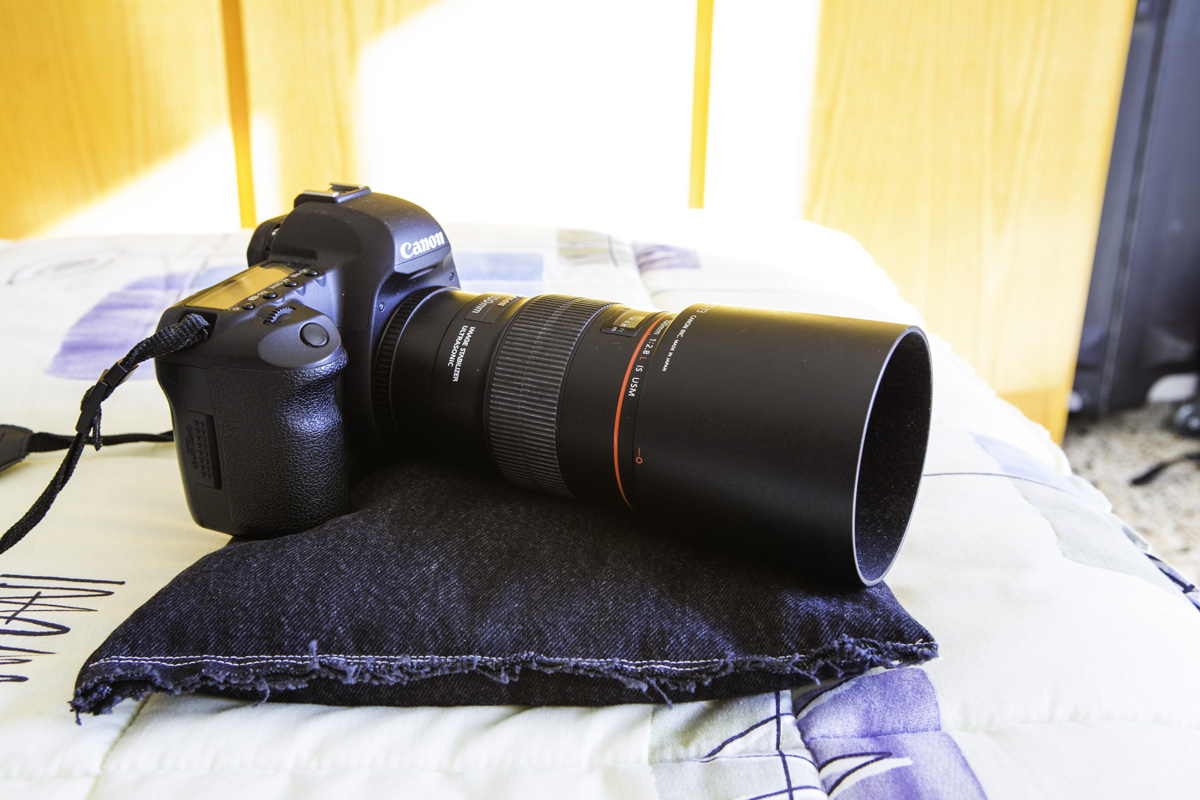
Credit: www.acasarella.net
Choosing The Fabric
Durability is very important when picking fabric for a camera bean bag. The fabric should be strong and long-lasting. It needs to hold up against wear and tear. Outdoor fabrics are a good choice. They are made to be tough. They can handle rough use and bad weather. Heavy-duty canvas is a popular option. It is thick and sturdy. It provides great protection for your camera. Another strong fabric is denim. It is also thick and durable. Make sure the fabric is easy to clean. Sometimes, camera bags get dirty. You want a fabric that cleans up nicely.
Fabrics come in many styles and colors. You can choose a color that you like. Some people like bright colors. Others like calm, neutral colors. Patterns can also be fun. Stripes or dots can add personality. Just make sure the color does not rub off. You don’t want it to stain your camera. Also, think about the look you want. Do you want it to match your other gear? Or do you want it to stand out?
Filling Options
Many materials can fill a camera bean bag. Rice is a popular choice. It is cheap and easy to find. Rice can be heavy, which helps stabilize the camera. It can also attract bugs if not properly stored.
Beans are another option. They are lightweight and easy to use. Beans can move around too much. This might make the bag unstable.
Plastic pellets are great for outdoor use. They do not absorb moisture. This keeps the bag dry and clean. Pellets are expensive compared to rice or beans.
Sand is very dense. It provides excellent stability. Sand is heavy and can be messy. It might leak if the bag is not sealed well.
Cutting The Fabric
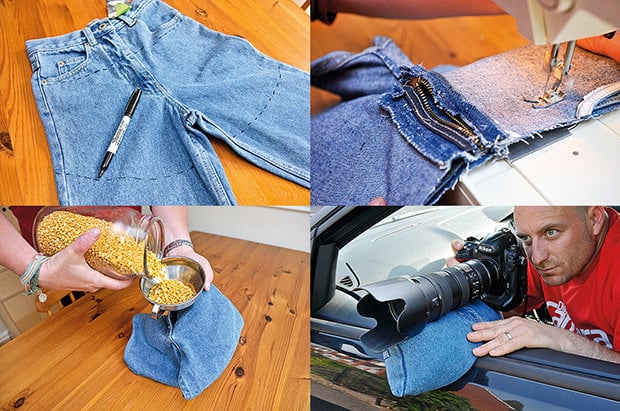
Start by choosing a soft fabric. Use a measuring tape to get the size. Decide how big the bean bag should be. Most bean bags are 12 inches long and 8 inches wide. Write down these numbers. These will guide you when cutting.
Take a large piece of paper. Draw the shape of your bean bag. Make sure it matches your measurements. Use a ruler for straight lines. Make it look like a rectangle or a square. Cut the paper pattern out. This will be your guide for the fabric. Lay it on the fabric before cutting.
Sewing The Bean Bag
Picking the right stitches is key. A strong stitch keeps the bean bag intact. Use the backstitch for its toughness. It holds fabric together securely. A simple running stitch can work too. But it might not be as strong. Always double-check your stitches.
Ensuring each stitch is tight is crucial. Loose stitches can cause leaks. You might lose the stuffing. So, make your stitches close together. This adds strength and durability. It ensures the bean bag lasts longer. Reinforce corners with extra stitches. They tend to wear out first.
Filling The Bag
Choosing the right filling is crucial for a camera bean bag. Use lightweight materials like beans or rice. These materials help absorb shocks. Avoid sharp objects in the bag. They may damage your camera.
Consider the size of the bag. A larger bag needs more filling. Make sure the bag is full, but not too tight. A tight bag won’t mold well.
Best Practices For Filling
- Use clean, dry materials.
- Check the bag for holes.
- Fill the bag evenly.
- Seal the bag properly.
Achieving Optimal Weight
Balance is key for a bean bag. It should be heavy enough to stay stable. But light enough to carry easily. Test the weight by holding the bag. Adjust the filling if needed. A well-filled bag protects your camera.
Closing And Securing
Edges need to be sealed tight. This keeps the stuffing inside. Use a strong thread to sew the edges. Stitch firmly. Make sure no gaps are left. Double check your work. Strong edges last longer. Keep your bean bag neat. Secure edges prevent spills. Safety first!
A zipper or Velcro makes closing easy. Choose what fits best. Zippers open fast. Velcro is also quick. Both are good for the bean bag. Attach them securely. Make sure they hold tight. Test the closure a few times. Ensure it stays shut.
Credit: marcgcphotography.com
Testing Stability
Place the camera on the bean bag. Check if it stays steady. If it wobbles, the beans might be loose. You can add more beans. Too many beans? Remove some to fix the balance. Stability is key for clear photos. Adjusting the number of beans helps a lot.
Feel the bean bag. Is it too soft? Add more beans. Is it too hard? Remove a few. The right amount gives the best support. A flat surface is best for testing. Use a table or the ground. Move the camera to different angles. Adjust the beans until it sits right. Aim for a firm but soft feel. This keeps the camera safe.
Tips For Use
A bean bag helps your camera stay still. Place it on a flat surface. Adjust it until the camera doesn’t wobble. Use soft beans for better grip. They mold to fit your camera. This keeps the camera steady. Avoid hard beans. They don’t work as well. Small bags are best for travel. Large bags help with bigger cameras.
Keeping your bean bag clean is easy. Check it for tears. Replace beans if needed. Wash the bag gently. Dry it before use. Store in a dry place. This keeps it fresh. Avoid heavy weight on the bag. This can damage it. Handle with care for long-lasting use.
Credit: petapixel.com
Frequently Asked Questions
What Do You Fill A Camera Bean Bag With?
Fill a camera bean bag with lightweight materials like polystyrene beads, rice, or dried beans. These materials provide stability and cushioning for your camera gear. Ensure the filling is dense enough to support the equipment without adding excessive weight. Choose eco-friendly options for sustainability.
How Do You Pack A Camera Without A Camera Bag?
Wrap the camera in a soft cloth or towel for protection. Use bubble wrap for extra cushioning. Place it in a sturdy backpack or purse, ensuring it’s secure and won’t shift. Avoid placing heavy items on top. Use lens caps to protect the lens and secure straps to prevent movement.
Is It Cheaper To Buy Or Make A Bean Bag?
Buying a bean bag is usually cheaper due to mass production. Making one can incur higher material costs. Consider time investment and sewing skills when choosing to DIY. Compare prices and decide based on your budget and preferences.
What Is The Best Filling For Bean Bags?
The best filling for bean bags is expanded polystyrene (EPS) beads. They provide comfort and durability. EPS beads are lightweight and mold to the body, offering excellent support. They are also affordable and easy to replace, making them a popular choice for bean bag enthusiasts.
Conclusion
Creating a camera bean bag is simple and fun. With basic materials, you can make one in minutes. Your camera stays stable, allowing clear shots. No tripod? No problem! This bean bag is portable and easy to use. Perfect for travel or quick shoots.
Save money and craft a useful accessory yourself. Try different sizes for various cameras. Personalize it to match your style. The camera bean bag proves a practical tool in photography. Craft it, use it, love it. Enjoy steady shots and hassle-free photography.
Your creativity and effort pay off in every click.