Setting up a tripod easel is simple. Align legs, adjust height, and secure canvas.
This art tool makes painting easy and comfortable. Tripod easels are popular among artists for their stability and versatility. Whether you’re sketching outdoors or painting at home, the right setup ensures a smooth creative process. Understanding how to properly set up a tripod easel can enhance your artistic experience, providing a firm base for your work.
This guide will walk you through the steps, ensuring your easel is stable and ready for inspiration. With the right setup, you can focus on what truly matters—creating art. Let’s explore how to get your tripod easel ready for your next masterpiece.
Table of Contents
Choosing The Right Tripod Easel
Setting up a tripod easel begins by adjusting the legs for stability. Ensure the easel height suits your working posture. Secure your canvas firmly to avoid movement while painting.
Consider Material And Build
Wood easels are strong and durable. They look nice too. Metal easels are lighter. Easier to carry around. Plastic ones are cheap. But not very strong. Decide what you need. Do you want a heavy easel or a light one? Check if it is easy to fold. Make sure it is stable. It should not wobble. Weight matters if you travel. Stability matters for painting.
Select Based On Usage
Artists need big easels. For large paintings. Students may want smaller ones. Easels that fit on desks. Think about where you will use it. Indoors or outdoors. Outdoors needs sturdy easels. Wind can knock them over. Adjustable height is good. Helps with different projects. Portability is key for travel. Choose wisely.

Credit: www.youtube.com
Understanding The Parts Of An Easel
A tripod easel has several parts. The legs are the most important. They hold the easel up. There is a canvas holder. It keeps the canvas in place. The tray is where you put brushes and paints. It is helpful. The back support gives the easel balance. This is so it does not fall. Each part is important. They work together.
Some easels have adjustable legs. This helps with height. You can make the easel tall or short. The canvas holder can move up and down. This is for different canvas sizes. The angle of the easel can change too. It tilts forward or back. This helps with painting. Adjusting these features is easy.
Preparing Your Workspace
A stable surface is important for setting up a tripod easel. Choose a flat and firm area. This helps in keeping the easel steady. Wood or tile floors work well. Avoid carpets as they can cause wobbling. Check that the surface is not slippery. This prevents accidents and keeps everything safe. Look around and find the best spot.
Good lighting is key to working with an easel. Find a place with natural light. It helps to see colors better. If natural light is missing, use bright lamps. Position lamps so they do not cast shadows. Shadows can make it hard to see your work. Adjust lights as needed. Make sure the area is well lit and clear.
Initial Setup Steps
Start by unlocking the clips or latches. This allows the easel to open. Pull the legs outward gently. Ensure they are fully extended. The easel should stand firm. Check if the base is stable. Avoid placing it on a slippery surface. This helps prevent falls.
Locate the adjustment knobs. These control the height. Turn the knobs to extend the legs. Adjust each leg one at a time. Make sure all legs are equal length. This keeps the easel balanced. Double-check the height for comfort. The easel should be at eye level. Now it’s ready for use!
Securing The Easel
Locking mechanisms are important for your easel. These keep it steady. Check all the parts. Make sure they are tight. If they are loose, tighten them. Use the knobs or clips provided. This will help the easel stay firm.
Check the legs of the easel. Spread them out fully. This will help with balance. Ensure each leg is locked in place. Use the locks provided. This prevents the legs from slipping.
When setting up, always check for stability. Push lightly on the easel. See if it wobbles. If it does, adjust the legs. Make sure it stands straight. This will help keep your art safe.
Adjusting Height And Angle
Unlock the legs of the easel. Pull each leg gently. Adjust until the easel is stable. Choose the height that fits your needs. Make sure the easel is level. Check the ground. It must be firm and flat. Safety is key when setting height.
Find the knob at the top of the easel. Turn it slowly. Tilt the easel to your liking. A slight tilt helps when painting. Comfort is important. Adjust to avoid strain. Balance the easel for best use. Keep the canvas secure. Double-check all adjustments before you start.
Positioning The Canvas
Place the canvas on the easel. Make sure it is centered. Use the top clamp to hold the canvas. Tighten the clamp gently. Ensure it does not damage the canvas. Adjust the bottom ledge. This helps in supporting the canvas. The canvas should not wobble. It should stay steady. Check the canvas from the front. Make sure it is straight. You can tilt the easel. This helps to avoid glare. Adjust according to the light.
Use extra clips for a stronger hold. Attach the clips at the sides. This prevents the canvas from moving. The clips should be tight. But do not squeeze the canvas too much. Check the easel legs. They should be spread wide. This gives better stability. Make sure the easel does not tip over. Try shaking it lightly. If it moves, adjust the legs again. Now your easel is ready for painting.

Credit: www.wikihow.com
Troubleshooting Common Issues
Setting up a tripod easel often involves common issues like uneven legs or loose screws. Ensure stability by adjusting the leg locks tightly. Check for level placement on the floor to prevent wobbling during use.
Dealing With Wobbling
A tripod easel can wobble if it is not set up right. Check the legs. They should be even and firm. Adjust them if needed. Tighten any loose screws. This helps keep the easel steady. The ground must be flat. If not, the easel will move. Use a small mat if the surface is uneven. This can help keep the easel from moving.
Fixing Misalignment
Misalignment can make painting hard. Align the easel by checking the top and bottom parts. They should be straight. Adjust the clamps if they are loose. This helps keep the canvas in place. Check for bent parts. Fix them so everything lines up right. Test the easel before you start painting. This ensures it works well.
Maintenance Tips For Longevity
Setting up a tripod easel involves securing the legs and adjusting the height for stability. Ensure the canvas holder is firm and level to avoid tilting. Regularly check and tighten screws for optimal performance.
Cleaning And Storage
Keep the easel clean to make it last longer. Use a damp cloth to wipe dust. Avoid harsh chemicals; they can damage the surface. After cleaning, dry the easel well. Store it in a cool, dry place. This prevents rust and mold. Cover the easel to protect from dirt. Proper storage ensures long life.
Regular Inspections
Check the easel regularly for wear. Look at screws and joints. Tighten any loose parts. Inspect for cracks or damage. Replace broken parts quickly. This keeps the easel safe to use. Regular checks help avoid bigger problems. Keep your easel in top shape.
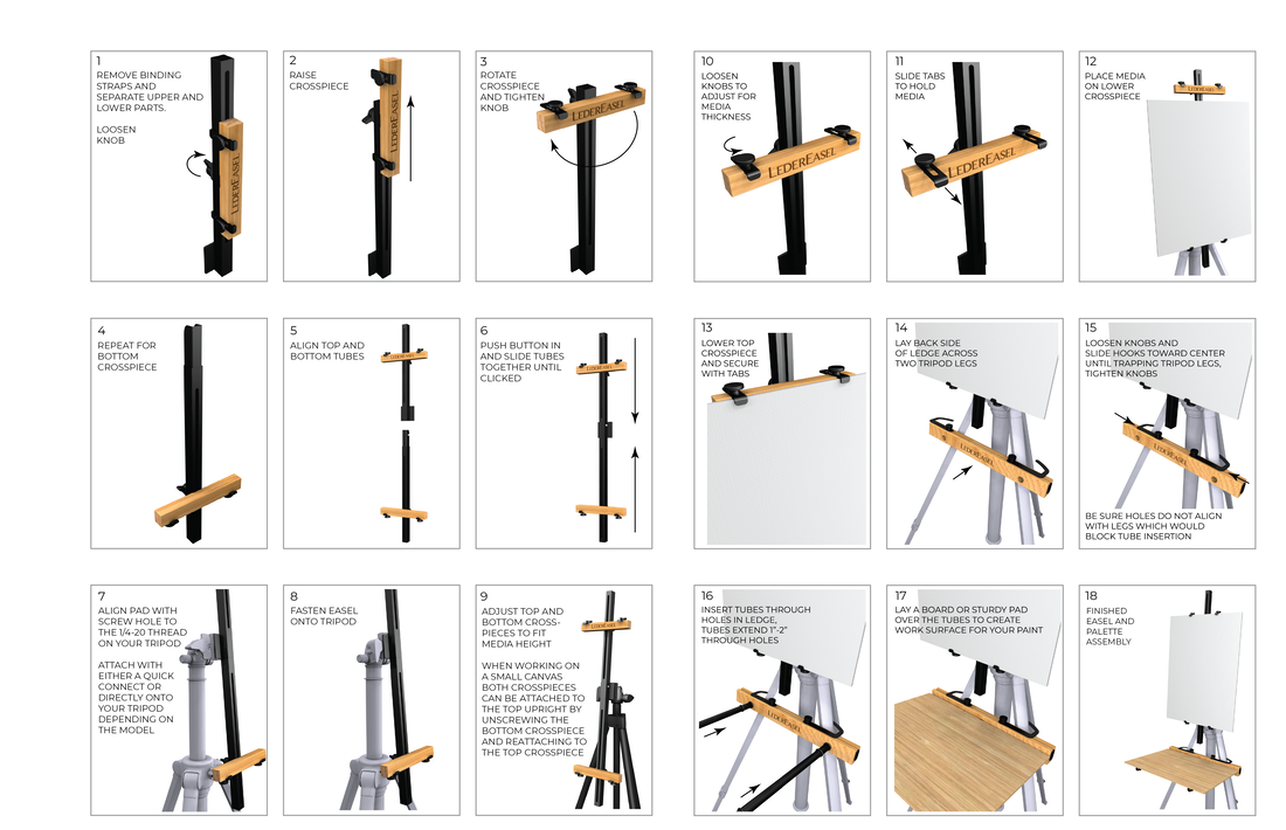
Credit: www.ledereasel.com
Frequently Asked Questions
How To Attach An Easel To A Tripod?
Secure the easel to the tripod using a universal adapter. Align the easel’s mounting hole with the tripod’s screw. Tighten the screw to ensure stability. Adjust the easel for the desired angle and height. Ensure everything is locked in place before using.
How Do You Set Up A Standing Easel?
To set up a standing easel, unfold the legs and adjust them for stability. Secure the canvas holder at the desired height. Tighten all knobs to ensure stability. Position the easel on a flat surface for optimal balance. Ensure the canvas is securely in place before starting your artwork.
How To Arrange An Easel?
Place the easel on a stable surface. Adjust the height using the screws or knobs. Ensure the canvas holder is secure. Position the canvas centrally. Tilt the easel back slightly for better viewing and painting angles.
How To Assemble Easel Board?
To assemble an easel board, connect the legs to the frame using screws or bolts. Adjust the height by sliding the legs. Secure the board in place using clamps or brackets. Ensure stability by tightening all connections. Check the board’s alignment and adjust if necessary for proper usage.
Conclusion
Setting up a tripod easel doesn’t have to be hard. Follow the steps carefully. Ensure stability by adjusting the legs. Double-check the angle and height. Secure your canvas properly. Practice makes perfect. Spend some time testing different positions. Find what works best for you.
This helps improve your painting experience. Enjoy the ease and flexibility a tripod easel offers. With patience, you’ll soon set it up confidently. Remember, a good setup enhances your art. Happy painting!