A cooking tripod is simple to make. You need basic materials and a few tools.
Cooking outdoors can be fun and adventurous. A tripod is useful for campfire cooking. It allows you to hang pots over the fire. This method makes outdoor cooking easier and more enjoyable. Building your own tripod is rewarding. It saves money and adds to your camping gear.
Plus, it’s customizable. You can make it to fit your needs. This guide will help you create a sturdy tripod. You’ll learn about materials, tools, and assembly steps. You’ll also get tips for safe and efficient use. Whether you’re a seasoned camper or a beginner, a homemade tripod is a great addition to your outdoor cooking setup.
Table of Contents
Materials Needed
Gathering the right tools is important for building a cooking tripod. You need a saw to cut the wood pieces. A drill helps make holes for screws. Screws keep the pieces together. Sandpaper smooths the wood. A measuring tape helps measure the wood correctly. Use a marker to mark spots for cutting or drilling. Safety goggles protect your eyes while working.
Choosing the right wood is crucial for your tripod. Pick hardwood for strength and durability. Oak and maple are good choices. Make sure the wood is dry to avoid bending. Check for knots; they can weaken the wood. Long pieces are better for stability. Straight pieces make the tripod firm. Use wood without cracks or damage.

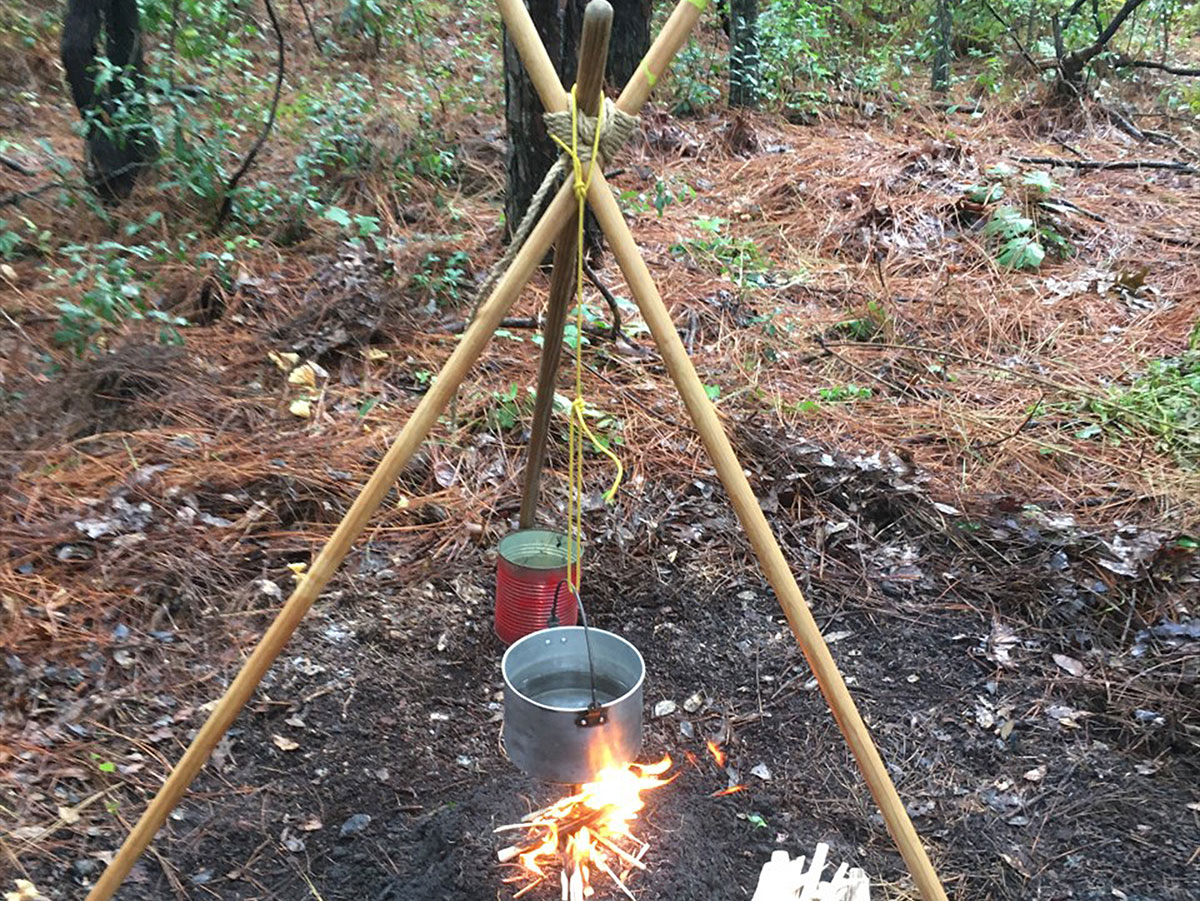
Credit: www.countryfile.com
Preparing The Wood
Choose three strong sticks. Each stick should be about the same length. Measure each stick to ensure they are even. Use a saw to cut them. Cut carefully to avoid mistakes. Check the lengths again after cutting.
Sand the edges of the sticks. This prevents splinters. Use sandpaper for this task. Start with rough sandpaper. Then, use a smoother one. Feel the edges to check for rough spots. Make sure every edge is smooth. This helps in safe handling.
Assembling The Tripod
Creating a cooking tripod involves gathering sturdy branches and securing them together. Tie the branches at the top with strong rope. Position the tripod over your cooking area for stability.
Creating The Base
Start with three strong sticks. They must be of equal length. Lay them on the ground. Form a triangle shape. This will be the base. Tie the ends firmly. Use a strong rope or wire. Make sure the sticks do not move. This base must be stable. It will hold the pot safely.
Securing The Joints
Take extra rope. Wrap it around the joint where sticks meet. Pull the rope tight. Knot it well. Check if the sticks wobble. If they do, tighten more. Use more rope if needed. The joints must stay firm. This ensures the tripod stands strong.
Adding A Hanging Mechanism
Choose a strong chain or rope to hang your pot. A chain is durable and can hold heavy pots. A rope is lighter and easier to carry. Make sure it is thick enough to support the weight. Check it for any breaks or damage. Safety first!
Use a hook to attach the pot to the chain or rope. The hook must be strong and secure. Look for a hook that can hold the pot safely. Attach it carefully to avoid accidents. Make sure it fits well with the pot handle.
Safety Tips
Choose the right materials for your cooking tripod. Always use fire-resistant materials. These can be metal or treated wood. This helps prevent accidents while cooking. Your safety is very important. Never use plastic or anything that can melt. Always check the material’s heat tolerance.
A cooking tripod must be stable. Check the tripod’s balance before use. Make sure it stands firm on the ground. Do not place it on uneven surfaces. Test its stability with a gentle push. If it wobbles, adjust its legs. A stable tripod keeps your cooking safe. It also prevents spills and falls.
Setting Up Outdoors
Find a safe spot away from trees and bushes. It should be a flat area. Safety is important to prevent fires. Ensure there are no overhanging branches. This keeps your cooking area clear. You can also check for wind. Wind can make cooking hard. If it’s windy, choose a sheltered place.
Clean the area from sticks and stones. Clearing the ground helps in stable setup. Make sure the earth is firm. Soft ground can make the tripod wobble. You can also dig a small pit. It helps in containing the fire. Keep a bucket of water nearby. Water is useful in case of emergencies. Make sure everything is ready before starting to cook.
Cooking Techniques
Keeping the right temperature is very important. It helps food cook well. Use your hand to feel the heat. If it’s too hot, move the pot away. This makes sure nothing burns. Always watch the fire. It can change fast. Small changes make big differences.
There are many ways to cook on a tripod. You can boil water for soup. You can also grill meat or vegetables. Each method is special. Boiling cooks food in water. Grilling gives food a smoky taste. Try different methods for fun meals. It’s a great way to learn new skills.
Credit: scoutlife.org
Maintenance And Storage
Clean the tripod after each use to keep it nice. Start by wiping it with a damp cloth. Remove any food bits stuck on it. Use a soft brush for hard spots. Dry it well to stop rust. Check the screws and parts for damage. Replace any missing parts. A clean tripod lasts longer.
Store the tripod in a dry place. Keep it away from moisture. Fold it properly to save space. Use a cover to protect it from dust. Label it if needed for easy finding. Keep it with other cooking tools for easy access. Make sure kids can’t reach it. A well-stored tripod stays in good shape.

Credit: www.countryfile.com
Frequently Asked Questions
How To Make A Homemade Tripod?
Use a sturdy stick, string, and a bolt to make a homemade tripod. Cut the stick into three equal parts. Attach them using string at one end. Secure a bolt to the center of the top end for the camera.
Adjust the legs for stability.
How To Make A Bbq Tripod?
To make a BBQ tripod, gather three sturdy metal rods. Connect them at the top using a chain or strong wire. Ensure stability by spreading the legs evenly. Attach a grill or hook for cooking. Adjust height as needed for optimal grilling.
How To Make A Cooking Tripod Dayz?
To make a cooking tripod in DayZ, combine three long sticks. Open your inventory, drag the sticks into the crafting area, and select “Craft Tripod. ” Use the tripod to cook food over a fire, ensuring your survival in the game.
How Do You Make A Tripod Overhead?
Securely attach a horizontal arm to the tripod. Mount your camera or device on the arm. Adjust angles for optimal overhead shots. Ensure stability with counterweights if necessary. Use a remote or timer for hands-free operation.
Conclusion
Creating a cooking tripod is both fun and useful. It enhances outdoor cooking experiences. A simple design can support pots over an open fire. Follow safety tips. Ensure the tripod is stable and strong. Use proper materials for lasting results.
Enjoy experimenting with different designs. This skill adds value to outdoor adventures. Share your creations with friends. Encourage creativity in your projects. Cooking outdoors brings people together. A homemade tripod is a great addition. Remember to enjoy the process. Embrace the simplicity of crafting.
Happy cooking on your new tripod!