Using a monopod can transform your photography, especially if you want sharper images and less fatigue. Many beginners think a monopod is only for sports or wildlife, but it’s useful for travel, street, and even video shoots. You don’t need to be a professional to benefit from one.
With the right technique, a monopod gives you stability, flexibility, and more freedom to move. Let’s dive into how you can use a monopod to get better results and avoid common mistakes.
Table of Contents
What Is A Monopod?
A monopod is a single-legged support for cameras. Unlike a tripod, it’s lighter and faster to set up. Most monopods are made from aluminum or carbon fiber, making them strong but easy to carry. You can find monopods ranging from 15 inches up to 65 inches in height.
| Feature | Monopod | Tripod |
|---|---|---|
| Weight | 1-2 lbs | 3-5 lbs |
| Setup Time | Seconds | Minutes |
| Portability | Easy | Bulky |
Most monopods have a rubber foot for grip and a threaded mount for attaching cameras or heads. They’re ideal when you want some stability but don’t have time or space for a tripod.
Choosing The Right Monopod
Selecting a monopod depends on your camera and shooting style. Here are key factors to consider:
- Height: Choose a monopod that reaches your eye level. If it’s too short, you’ll have to bend, causing discomfort.
- Material: Carbon fiber is lighter but more expensive. Aluminum is heavier but cheaper.
- Load Capacity: Check if the monopod supports your camera and lens weight. Most support up to 8-20 lbs.
- Locking Mechanism: Twist locks are faster but can slip; flip locks are more secure but slower.
- Mount Type: Standard 1/4-inch thread fits most cameras. If you use a quick-release plate, make sure your monopod is compatible.
| Monopod Model | Material | Max Height | Load Capacity |
|---|---|---|---|
| Manfrotto 680B | Aluminum | 63 in | 22 lbs |
| Sirui P-326 | Carbon Fiber | 61 in | 22 lbs |
| Benro Adventure MAD49A | Aluminum | 66 in | 18 lbs |
Many beginners overlook load capacity. If your monopod can’t hold your gear, it may bend or break.
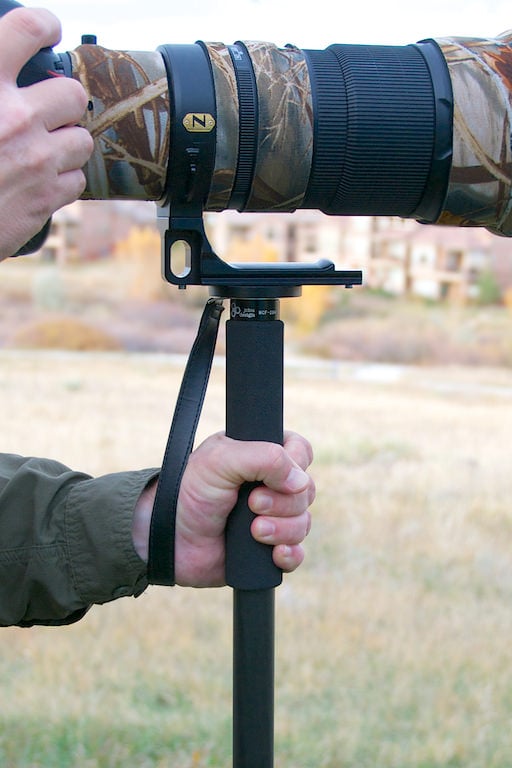
Credit: photographylife.com
How To Set Up A Monopod
Setting up a monopod is simple, but there are tricks for better stability.
- Extend the Legs: Open only as much as you need. Longer is not always better.
- Lock the Sections: Make sure all locks are tight. Loose sections reduce stability.
- Attach Your Camera: Screw your camera or quick-release plate onto the top. Double-check it’s secure.
- Adjust Height: The camera should be at eye level when you stand straight.
For heavy lenses, use the lens collar mount instead of the camera body. This balances weight and prevents strain.
Using A Monopod For Photography
A monopod works best when you use the right posture and technique.
- Position the Foot: Place the monopod foot in front of you, between your feet.
- Lean Slightly: Tilt the monopod towards your body for added balance.
- Hold the Camera: Use one hand for the camera, the other for the monopod grip.
- Keep Elbows In: Tuck your elbows close to your body to reduce movement.
Many photographers use the “tripod stance”: feet shoulder-width apart, monopod between them. This creates a stable triangle.
For fast-moving subjects, keep the monopod loose enough to swivel. This lets you follow action without losing support.

Credit: shotkit.com
Using A Monopod For Video
Monopods are popular for video shooting. They provide steadiness while allowing movement.
- Pan and Tilt: You can pan left and right smoothly by rotating the monopod.
- Walk and Shoot: With practice, you can walk with the monopod for dynamic shots.
- Fluid Head: Attach a video fluid head for smoother motion.
A common mistake is pushing the monopod too hard into the ground, causing shaky footage. Gentle pressure is enough.
| Shooting Style | Monopod Benefit | Common Mistake |
|---|---|---|
| Sports | Quick repositioning | Over-tightening locks |
| Wildlife | Long lens support | Poor balance |
| Travel | Easy to pack | Too short monopod |
Practical Tips And Insights
- Stabilize With Your Body: Use your own body weight to steady the monopod. Beginners often rely only on the pole.
- Use a Wrist Strap: If your monopod has a wrist strap, use it. It prevents drops during quick moves.
- Check Local Rules: Some venues don’t allow monopods. Always check before entering.
- Practice Movement: Try different positions—sideways, forward, and backward—to see what feels most stable.
- Avoid Over-Extending: Don’t extend the monopod beyond its safe limit. This weakens stability.
One non-obvious insight: In windy conditions, hold the monopod lower down to minimize sway. Another tip: When shooting at slow shutter speeds, gently press the monopod against a solid object (like a wall) for extra support.

Credit: www.youtube.com
Frequently Asked Questions
How Do I Carry A Monopod While Traveling?
Most monopods collapse to under 18 inches, fitting in backpacks or suitcases. Some models have clips for attaching to bags. Always remove your camera before packing.
Can I Use A Monopod Instead Of A Tripod?
For most situations, yes. A monopod offers stability for telephoto lenses and low-light shots. However, it won’t hold your camera steady for long exposures or self-portraits.
What’s The Best Way To Clean And Maintain A Monopod?
Use a soft cloth to wipe the pole after each use. Avoid sand and water inside the locking mechanisms. Once a month, check for loose screws and lubricate moving parts if needed.
Are Monopods Allowed In Sports Stadiums?
Rules vary by location. Some stadiums ban monopods for security reasons. Always check their guidelines before bringing your gear. The Wikipedia Monopod Guide has useful info on regulations.
Can I Use A Monopod For Smartphone Photography?
Yes, many monopods have adapters for smartphones. They help with stability and make it easier to shoot video or take group photos.
Using a monopod is simple but powerful. With the right technique, you’ll get sharper images and smoother videos. Practice often, experiment with angles, and you’ll quickly see improvement in your shots.