Mounting an Arlo camera is a practical way to boost your home’s security. The process is quick, but doing it right ensures your camera works well and lasts longer. If you’re new to smart cameras, you might feel unsure where to start.
This guide will help you mount your Arlo camera safely, avoid common mistakes, and get the best view for your home.
Table of Contents
What You Need Before You Start
Check that you have these items:
- Arlo camera (charged or with new batteries)
- Mounting bracket (included with most models)
- Screws and wall anchors
- Screwdriver or drill
- Smartphone or computer with the Arlo app
Having everything ready saves time and avoids frustration.
Steps To Mount Your Arlo Camera
1. Pick The Best Location
Choose a spot with a clear view and good Wi-Fi signal. Common places include entryways, garages, and backyards. Avoid pointing the camera directly at the sun or busy streets to reduce false alerts.
2. Test The Camera Angle
Hold the camera where you plan to mount it. Open the Arlo app to see the live feed. Adjust until you cover the area you want, like your front door or driveway.
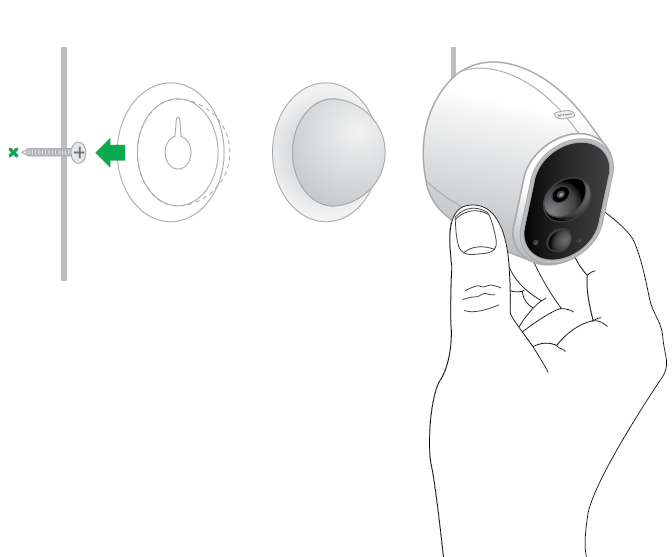
3. Install The Mount
Mark the screw holes using the mount as a guide. For wood, use screws directly. For brick or concrete, drill holes and use wall anchors. Secure the mounting bracket tightly so it doesn’t move.
4. Attach The Camera
Snap or screw the Arlo camera onto the bracket, depending on your model. Aim it based on your earlier test. Double-check the live feed in the app.
5. Fine-tune Settings
Open the Arlo app to adjust motion zones, alerts, and video quality. Proper settings help the camera perform better and save battery.

Credit: www.amazon.com
Comparing Arlo Mount Types
Different Arlo models use different mounts. Here’s a quick look:
| Mount Type | Best For | Tool Needed |
|---|---|---|
| Magnetic | Indoor, easy adjust | None |
| Screw-in | Outdoor, secure hold | Drill/Screwdriver |
| Adjustable Arm | Flexible angles | Drill/Screwdriver |
Common Mistakes And How To Avoid Them
- Mounting too high: Most people put cameras above 10 feet. For best faces and details, keep them around 7-8 feet high.
- Ignoring Wi-Fi signal: A weak signal leads to delayed video or missed alerts.
- Skipping weather protection: Outdoor cameras last longer under eaves or covers.
Credit: kb.arlo.com
Quick Comparison: Indoor Vs Outdoor Mounting
| Feature | Indoor | Outdoor |
|---|---|---|
| Exposure | Protected | Rain/Sun |
| Mount Type | Magnetic | Screw-in |
| Maintenance | Low | Check regularly |
Mounting your Arlo camera correctly means you’ll get clearer footage and more reliable alerts. Take your time with placement and setup. Small adjustments can make a big difference in security.
Frequently Asked Questions
How High Should I Mount My Arlo Camera?
For most homes, 7 to 8 feet is ideal. This height captures faces clearly but is still out of easy reach.
Can I Mount Arlo Cameras Without Screws?
Yes, some Arlo models use magnetic mounts for indoor use. For outdoor, screws are best for security.
Does Mounting Position Affect Motion Detection?
Absolutely. Angling the camera slightly down and avoiding direct sunlight improves motion accuracy.
What If My Wi-fi Signal Is Weak?
Try moving your router closer, or use a Wi-Fi extender. Reliable signal is key for live video.
Where Can I Find More Arlo Setup Guides?
Visit the official Arlo Support page for detailed resources and troubleshooting tips.

Credit: www.youtube.com