Sewing a camera bag can be simple and rewarding. First, gather materials like fabric, thread, and padding.
Then, follow a step-by-step guide to stitch a sturdy, stylish bag for your camera. Crafting your own camera bag offers a unique touch. It’s a practical project that lets your creativity shine. A handmade bag not only protects your camera but reflects your personal style.
With basic sewing skills, you can design a bag that fits your needs. Choose durable fabric and soft padding for safety and comfort. This project suits beginners and experts alike. You’ll feel proud using something you created. Plus, it’s a chance to personalize your gear. Ready to start sewing? Discover tips and tricks to make your camera bag both functional and fashionable.
Table of Contents
Materials And Tools
Strong fabric is important for a camera bag. Canvas and nylon are good choices. They are durable and can hold the weight. Foam padding adds extra protection. It keeps the camera safe from bumps. Cotton lining is soft and nice for the inside. It protects the camera lens.
Sharp scissors help cut fabric easily. Sewing machine speeds up the sewing process. Needles are needed for hand sewing. Pins hold the fabric in place. Measuring tape ensures correct size. Thread secures the stitches. Marker or chalk marks the fabric. These tools make sewing easier.
Choosing The Right Fabric
Durability is key for a camera bag. Your bag must last long. Thick fabrics like canvas or denim are strong. They protect the camera from bumps. Waterproof materials are also great. They keep the camera dry. Look for fabrics that do not tear easily. Sturdy fabrics will keep your camera safe. A good fabric makes a durable bag.
A camera bag should look nice and feel good. Colors and patterns make the bag special. Choose colors that match your style. Patterns can add fun to the bag. Think about the bag’s shape. It should fit your camera and look good. Simple designs are often best. They keep the bag neat and clean. A pretty bag is fun to carry.
Cutting The Fabric
First, lay out the fabric flat. Use a tape measure to get the right size. Measure width and height of the camera. Add extra inches for seams and padding. Check measurements twice. Accuracy is important. Wrong measurements can ruin the bag.
Sharp scissors are a must. They cut clean lines. Use chalk for marking. Draw lines where you want to cut. Follow these lines carefully. Cut slowly and precisely. Avoid jagged edges. Neat cuts make sewing easier. Double-check the pieces before sewing. Correct mistakes now, not later.
Preparing The Padding
Selecting the right padding is very important. Soft padding protects the camera well. Foam is a good choice. It is light and easy to cut. Felt is also nice. It gives a soft touch and keeps the camera safe. Check thickness before buying. Thicker padding offers more protection. Choose colors that match your bag.
Start by measuring your camera. Cut the padding to fit the size. Use sharp scissors for clean edges. Shape the padding as needed. Round corners for a snug fit. Test the fit with your camera. Make sure it does not move around. Adjust if needed. Double check the padding thickness. It should not be too thin.
Sewing The Outer Shell
Begin by selecting a strong thread. It helps hold the bag together. Use a straight stitch for most of the seams. It creates a clean line. Backstitch at the start and end to secure threads. This prevents unraveling. A zigzag stitch is useful for edges. It stops fabric from fraying. Practice stitches on scrap fabric first. It helps improve your skill. Keep the stitches even for a neat look. A seam ripper can fix mistakes. Just be careful using it.
Lay the fabric pieces flat. Match edges carefully. Use pins to hold them. This keeps the pieces from moving. Begin stitching from one edge. Move slowly and follow the lines. Check alignment as you sew. Adjust if needed. Sew all sides before turning the bag inside out. Press seams with an iron. It makes them crisp. Add any extra details like pockets or straps.
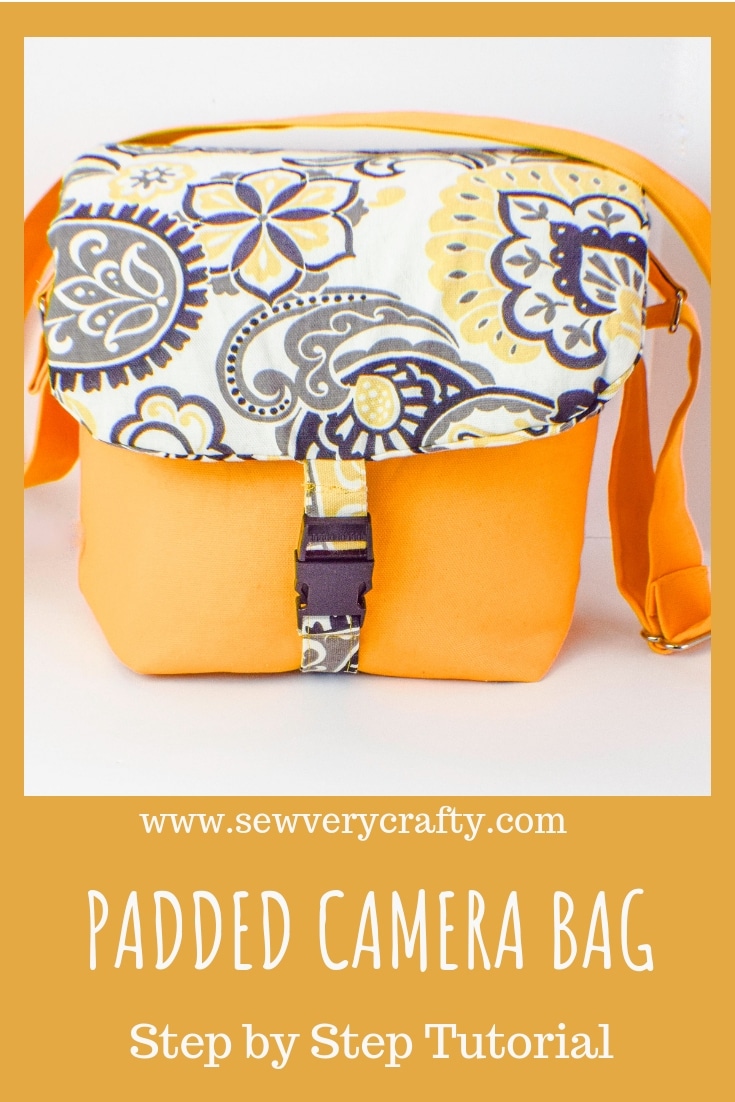
Credit: sewverycrafty.com
Creating Inner Compartments
Start by choosing the right fabric for the compartments. Soft and durable fabric works best. Measure the size of your camera and accessories. Use these measurements to cut fabric pieces. Stitch the fabric pieces together. Create pockets or slots as needed. Consider the arrangement. Should it be vertical or horizontal? Think about the ease of access. Make sure each compartment fits snugly.
Attach compartments to the inside of the bag shell. Use strong stitches for durability. Position the compartments carefully. Align them with the bag’s shape. Ensure they are secure and won’t move. Test by placing your camera inside. Check if everything fits well. Adjust if necessary. Remember, sturdy attachment is key.
Adding Zippers And Closures
Zippers help keep your camera bag safe and secure. Choose a zipper that is strong. Metal zippers last long. They are also durable and look nice. Plastic zippers are lightweight. They are good for small bags. The zipper should match the bag’s color. This makes the bag look neat. Choose a zipper that is easy to open and close. This helps you get your camera quickly. A good zipper will keep your camera protected from dust and rain.
Attach the zipper with strong stitches. Use a needle and thread that match the bag. Sew the zipper’s ends tightly. This stops it from coming off. Stitch slowly to avoid mistakes. Make sure the zipper is straight. A crooked zipper can break easily. Check the zipper after sewing. Open and close it several times. If it works well, your camera bag is ready to use.

Credit: www.youtube.com
Final Assembly
Start by aligning all the camera bag pieces. Make sure each piece fits well. Next, sew the sides together using a strong thread. A strong thread keeps the bag secure. Double-check the stitches for strength. Attach the base carefully to the bottom. Ensure no gaps are visible. Add padding for extra protection. Sew the zipper along the top edge. The zipper helps in easy access to the camera.
Check all seams for any loose threads. Loose threads can weaken the bag. Tug gently on the handles to test their strength. Make sure the padding is even. Uneven padding can affect the camera’s safety. Look for any uneven stitches. A neat stitch gives a professional look. Ensure the zipper opens and closes smoothly. A smooth zipper means easy access.
Personalizing Your Bag
Decorative elements make your camera bag special. Use bright fabrics. Add colorful buttons. Choose patterns you love. They show your style. Sew patches on the sides. Or use embroidery. These ideas add charm. They make your bag unique. It’s fun to create a look you adore.
Custom embellishments add a personal touch. Sew on pockets for extra storage. Use different zippers. They add flair and function. Attach a keychain to the handle. It’s both useful and stylish. Add ribbons or lace for a soft look. They make your bag elegant. Experiment with different materials. Your camera bag will stand out.

Credit: sewfearless.com
Care And Maintenance
Regularly clean your sewn camera bag to remove dirt and dust. Inspect seams and zippers for wear and tear. Reinforce weakened areas with extra stitches to maintain durability.
Cleaning Tips
Dust can damage your camera bag. A soft brush removes dust quickly. Wet cloths clean stains. Use mild soap for tough stains. Avoid harsh chemicals. They can ruin fabrics. Dry the bag in shade. Sunlight fades colors. Check for loose threads. Trim them carefully. A clean bag lasts longer.
Storage Suggestions
Store the bag in a cool, dry place. Humidity causes mold. Keep it away from direct sunlight. Hang the bag if possible. It prevents creases. Use a dust cover for added protection. Avoid overloading the bag. It keeps the shape intact. Regularly check for wear and tear. Repair small damages early.
Frequently Asked Questions
What Can You Use Instead Of A Camera Bag?
Use a backpack with padded dividers or a messenger bag with adjustable compartments for safe camera storage. Opt for a hard-shell case or a sling bag for quick access. Consider using a tote with inserts for organization and protection. Ensure the chosen alternative provides adequate cushioning and is weather-resistant.
How To Sew A Bag Step By Step?
To sew a bag, gather materials like fabric, thread, and a sewing machine. Cut fabric pieces, pin them together, and sew seams. Attach handles and any closures. Finish edges neatly. Customize with embellishments or pockets. Ensure durability by reinforcing seams.
Enjoy your handmade bag creation!
How To Make A Small Camera Bag?
Choose durable fabric and padding material. Cut fabric to desired size, stitch edges, and add padding. Attach zippers or Velcro for closure. Sew on adjustable straps for convenience. Customize with extra pockets for accessories. Your DIY camera bag is ready!
How To Properly Pack A Camera Bag?
Organize gear by priority, placing the camera and lenses in the center. Use padded dividers for protection. Store accessories like batteries and memory cards in side pockets. Ensure weight distribution is balanced for comfort. Keep frequently used items easily accessible to save time during shoots.
Conclusion
Creating your own camera bag is rewarding and fun. You learn useful sewing skills. The process saves money. Plus, you get a personalized bag. Unique to your style. The steps are simple to follow. Start with the right materials. Measure carefully.
Use durable fabric. Don’t rush the sewing. Take your time. Enjoy the creative journey. Soon, you’ll have a bag to protect your camera. One that reflects your taste. Feel proud of your handmade creation. Ready to carry your gear anywhere.
Happy sewing!