Resetting a Nanit Camera is simple. Follow a few steps to restore its functionality.
Whether you’re troubleshooting or starting fresh, resetting can help. The Nanit Camera offers advanced features for baby monitoring. But like any tech device, it sometimes needs a reset to function properly. This guide will help you reset your Nanit Camera with ease.
You might face connectivity issues or app syncing problems. Resetting often solves these issues, bringing your camera back to optimal performance. It’s a straightforward process, but essential for maintaining the reliability of your monitoring system. Understanding how to reset your device ensures you get the most out of its features. Let’s get started on resolving any hiccups and keeping your monitoring seamless.
Credit: support.nanit.com
Table of Contents
Preparation Steps
Collect all the necessary tools for resetting the Nanit camera. You need a small screwdriver. Also, have a soft cloth ready. This helps in cleaning the camera. Make sure you have access to the WiFi network. A stable connection is important.
It’s smart to keep your camera settings safe. Use the app to save settings in the cloud. This ensures you don’t lose any important settings. Take note of your current settings. This includes resolution, alerts, and preferences. You can write them down or save them on your device. These steps help to restore the settings later easily.
Power Cycling
Begin by pressing the power button on the camera. Wait for the light to go off. This ensures the camera is off completely.
Remove the plug from the wall outlet. Be sure the cord is detached. Leave it unplugged for at least 30 seconds. This allows the camera to reset.
Factory Reset
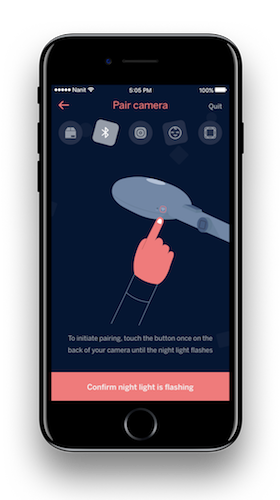
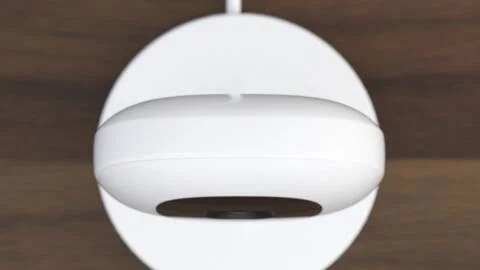
Locate the reset button on your Nanit camera. It’s usually at the back. Use a small pin or paperclip. Gently insert it into the hole. You will feel a click when it touches the button. Make sure the camera is powered on before you start.
Press and hold the button for 10 seconds. You will see a light flash. This means the reset is happening. Don’t let go until the light stops flashing. Once done, your camera will be like new. You can now set it up again.

Credit: community.nanit.com
Reconnecting To Network
Find the Wi-Fi settings on your phone or tablet. Open the settings menu. Choose the correct Wi-Fi network. It’s important to pick the right one. If you choose wrong, it won’t work.
Tap the password field. Type your Wi-Fi password. Make sure it is correct. Check each letter carefully. Incorrect passwords won’t connect. If unsure, ask someone for help. Click connect once done. Wait for the camera to join the network. It might take a few seconds.
Reconfiguring Settings
Resetting your Nanit Camera involves pressing and holding the reset button for 10 seconds. This simple action restores factory settings. Ensure the camera is powered on during this process for successful reconfiguration.
Adjust Camera Position
Make sure your camera is in a good spot. It should cover the whole crib. Move it until you get the best view. Check if you see all corners. This helps in getting a clear image.
Keep the camera at a safe distance. It should not be too close. This keeps the baby safe. Once set, tighten the screws. This will keep it steady.
Set Notifications Preferences
Notifications help you stay alert. You can choose what alerts you need. Pick from sound or motion alerts. This helps you know when the baby moves.
Too many alerts can be annoying. Set only the important ones. This keeps you aware without the noise. Check your app settings to adjust them.
Testing The Camera
Make sure the camera shows a clear picture. Look at the colors. They should be bright and real. Check if the picture is steady. No shaking or blurring. Try different lights. Bright and dark. The picture should still be good. This means the camera is working well.
Listen to the sounds from the camera. They should be clear and loud. No noise or static. Speak near the camera. Your voice should be heard clearly. Try different volumes. Soft and loud. The sound should always be good. This checks if the camera’s audio works right.
Troubleshooting Issues
Nanit camera often faces connectivity issues. Ensure your Wi-Fi network is stable. Check if the router is near the camera. A weak signal can cause problems. Restart the camera and router. This helps refresh the connection. If the problem persists, try reconnecting the camera to Wi-Fi. Go to the settings in the Nanit app. Follow the instructions to reconnect. Make sure you enter the correct password. Sometimes, updating the app can solve issues too. Ensure your app is the latest version. Always check for software updates. They fix bugs and improve performance.
Distorted images can be frustrating. First, clean the camera lens. Dust or smudges affect image quality. Use a soft cloth to wipe the lens. Next, check the camera position. Ensure it’s steady and not tilted. Adjust the camera if needed. Image distortions may also arise from lighting issues. Ensure the room is well-lit. Avoid direct light on the lens. It can cause glare. Update the camera firmware regularly. Updates fix technical glitches. They often enhance image quality. Always ensure the camera is securely mounted. A shaky mount causes image blurring.
Credit: support.nanit.com
Maintenance Tips
Keeping your Nanit camera up-to-date is crucial. Regular updates fix bugs and improve performance. Check for updates often. It helps the camera work better. Updates can add new features too. Always download updates from trusted sources. Avoid skipping updates. They keep your camera secure. A well-updated camera lasts longer.
A clean lens ensures clear images. Dust and smudges can blur the view. Use a soft cloth for cleaning. Gently wipe the lens. Avoid using harsh chemicals. They can damage the lens. Clean it every few weeks. A clean lens shows a clear picture. It helps you watch your baby better.
Frequently Asked Questions
How Do You Factory Reset A Nanit?
To factory reset a Nanit, hold the reset button for 10 seconds. Ensure the device is powered on. Release the button when the LED light turns off, then back on. Follow app instructions to set up again. This process clears all data and settings, returning the device to its original state.
How Do I Refresh My Nanit Camera?
To refresh your Nanit camera, unplug it from the power source, wait 10 seconds, then plug it back in. Ensure your app is updated for optimal performance.
Can I Give My Nanit To Someone Else?
Yes, you can give your Nanit to someone else. Ensure you reset the device and remove your account. This allows the new user to set up their own account and access the monitor. Properly transferring ownership ensures privacy and security for both parties.
How To Reset Nanit To Sell?
Reset Nanit by accessing settings in the app. Select “Factory Reset” to erase data and restore defaults. Ensure the camera is offline during this process. Once reset, the device is ready for sale. Follow specific instructions in the Nanit app for accurate guidance.
Conclusion
Resetting your Nanit camera is simple and quick. Follow each step carefully. Ensure your camera functions properly after reset. A reset can solve many common issues. Restarting the device often helps. Regular maintenance keeps your camera working well. Reliable performance is key for peace of mind.
Now, you can monitor your baby without stress. Enjoy seamless connectivity with your Nanit camera. Troubleshooting becomes easier with these steps. Stay informed and confident using your device. Your camera is now reset, ready to use. Effective solutions make parenting easier.
Keep this guide handy for future reference.