Making a tripod stand is simple and fun. You can use materials found at home.
Let’s explore how to create one easily. Tripods are essential for steady photography or filming. They hold your camera or phone in place. Store-bought tripods can be costly. Crafting a DIY tripod stand is both economical and rewarding. You only need a few items, like sticks, rubber bands, and a base.
This project suits beginners and hobbyists. Building your own stand offers flexibility. You can customize it to your needs. Plus, it’s a great way to learn basic crafting skills. Whether you need it for a camera, a phone, or a tablet, a homemade tripod stand can be a handy tool. Ready to get started? Let’s dive into the simple steps ahead.

Credit: www.youtube.com
Table of Contents
Materials Needed
A saw helps cut the wood. A drill makes holes for screws. A measuring tape ensures pieces are the right size. Sandpaper smooths the wood. A screwdriver tightens the screws. Glue joins the parts together. Safety goggles protect your eyes. A workbench holds your materials.
Pick strong wood like oak or pine. Avoid soft types, they break easily. Check for straight pieces, no curves or bends. Look for smooth surfaces, fewer knots. Buy enough wood for three legs. Each leg should be the same length. Consider wood thickness; thicker is sturdier. Think about color, darker woods look nice.

Credit: www.pinterest.com
Preparing The Wood
Start with three pieces of wood. Each piece should be the same length. Use a ruler to measure accurately. Mark the wood with a pencil. Cut the wood at the marks. Use a saw for clean cuts. Make sure the cuts are straight. Straight cuts help the tripod stand well.
Sand the wood to make it smooth. Use sandpaper for this task. Rub the sandpaper on the wood. Do this until the surface feels nice. Check all sides for rough spots. Smooth wood makes the tripod look good. It also makes it safe to touch. Sanding is an important step.
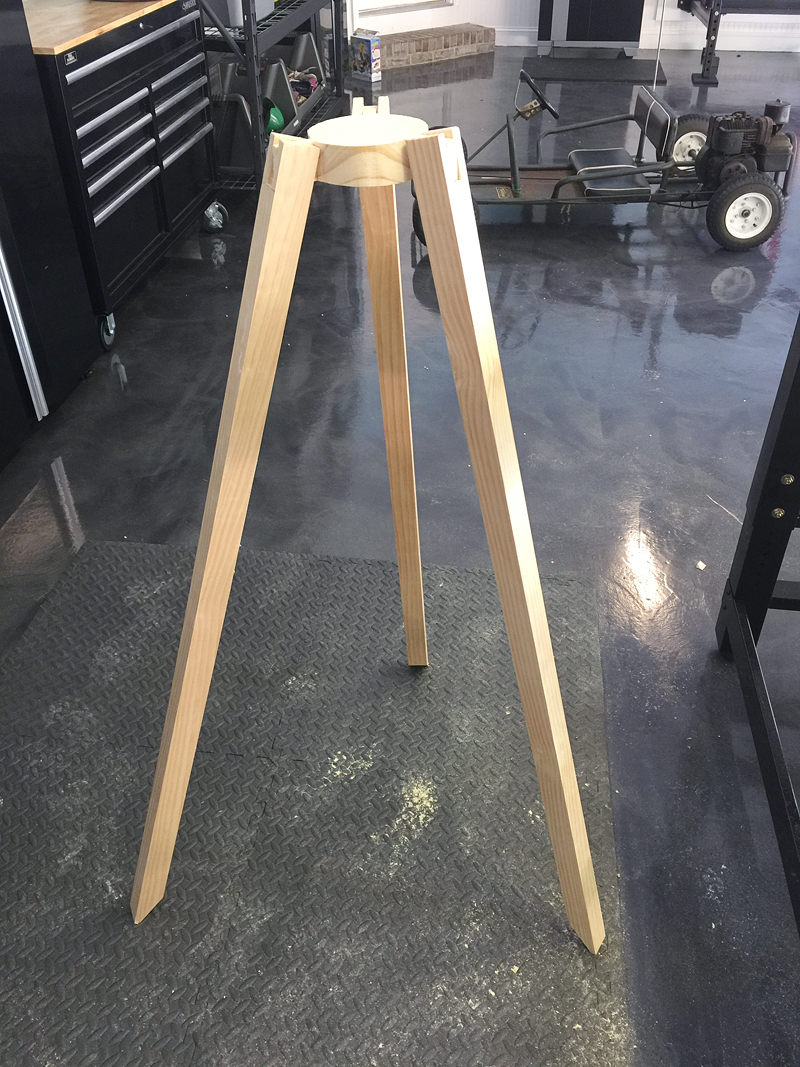
Constructing The Legs
Start by marking spots for holes on each leg. Make sure marks are evenly spaced. Use a drill to make small holes at each mark. Hold the drill steady while drilling. Keep the drill perpendicular to the leg surface. This ensures holes are straight and neat. Use a bit that matches the size of the connectors. This helps the connectors fit snugly. Double-check the position of each hole. Correct mistakes before drilling deeper.
Insert connectors into drilled holes. Push them until they fit tightly. Make sure each connector is level with the leg. Use a hammer gently if needed. Connectors hold the legs together securely. Choose connectors made of strong metal or plastic. This ensures the tripod stands firm. Check each connector for tightness. Loose connectors can cause the tripod to wobble. Adjust them if necessary for a sturdy stand.
Credit: www.bowerpowerblog.com
Building The Center Support
First, measure the center piece carefully. Use a ruler for accuracy. Mark the spot with a pencil. This helps you cut straight. Choose wood that is strong. It must hold the tripod. Cut the wood with a saw. Be careful not to cut yourself. Smooth the edges with sandpaper. This stops splinters. Now the center piece is ready.
Attach the legs to the center piece. Use screws for a tight hold. Drill holes where the screws go. This makes it easier. Put the screws in the holes. Turn the screwdriver to tighten them. Check the legs for wobbling. If they wobble, tighten the screws more. The tripod should stand firm. Now, the legs are secure.
Assembling The Tripod
Start with the legs of the tripod. Align them properly. Check the screws and bolts. They should be tight. Use a screwdriver if needed. Attach the center column. Ensure it fits snugly. Secure it with the knob. Now, attach the head. Make sure it is level. Test the movement. It should be smooth. Adjust any loose parts. Your tripod is now taking shape.
Spread the legs wide for better stability. Lock them in place. Use the leg locks. They must be firm. Check the ground surface. It should be flat. Adjust the legs if uneven. Add a weight hook. It helps with balance. Test the setup by pressing gently. It should not wobble. Recheck all parts. Everything should be tight. Now your tripod is stable and ready.
Finishing Touches
Adding final details ensures your homemade tripod is sturdy and functional. Secure joints tightly for stability. Attach rubber feet to prevent slipping on surfaces.
Painting Or Staining
Choose a color or stain for your tripod. Bright colors make it fun. Staining shows off the wood’s natural beauty. First, sand the wood smooth. Wear a mask to keep safe. Next, apply a primer or base coat. This helps the paint stick better. Use a brush or spray for even coverage. Let it dry completely before the next coat. Two coats might be enough. Always paint in a well-ventilated area.
Adding Non-slip Pads
Non-slip pads prevent your tripod from sliding. Cut pads to fit the legs. Use strong glue to attach them. Check if they stay secure. Non-slip pads help on smooth surfaces. Test the tripod on different floors. Adjust if needed. Rubber pads work well for this. They last long and are easy to find. Keep your tripod steady with these pads.
Testing The Tripod
Setting up a tripod involves adjusting the legs to form a stable base. Secure the center column, ensuring it stands firm. Balance the weight evenly for optimal support and reliability.
Checking Balance
The tripod must stand firm. Check its balance first. Ensure all legs touch the ground. Adjust the legs if needed. The tripod should not wobble. A wobbly tripod is unsafe. Test it by gently pushing. It should not tip over. Make sure it stays still. A balanced tripod is stable.
Adjusting Height
The tripod height matters. Decide how high it should be. Adjust the legs evenly. Use the locks on each leg. Make sure they are tight. Loose locks can cause falls. Check the height again. It should be just right. The tripod must be tall enough. But not too tall. Adjust it until perfect.
Troubleshooting Common Issues
Check if the tripod legs are locked tightly. A wobbly tripod can cause a shaky camera. Adjust the leg locks to make sure they are firm. You might need to clean the locks to remove dirt. Sometimes, dirt can make them loose.
Examine all the screws and joints. Loose connections can make the tripod unstable. Use a screwdriver to tighten any loose screws. Make sure each joint is secure. Sometimes, using a small amount of lubricant can help.
Frequently Asked Questions
How To Make A Diy Tripod Stand?
Gather materials: PVC pipes, connectors, screws, and a mounting plate. Cut pipes to desired lengths. Assemble pipes using connectors to form a stable tripod shape. Secure the mounting plate on top with screws. Ensure stability by adjusting angles and tightening connections.
Test with a camera for balance and functionality.
How To Make A Tripod Without A Tripod?
Use sturdy objects like books or rocks for support. Lean your camera against them for stability. Use a string tripod by tying a string to your camera and stepping on it for tension. Use a bag of rice or beans for adjustable support.
Secure your camera on a flat surface for steadiness.
What Can Be Used As A Makeshift Tripod?
Use a stack of books or a sturdy chair as a makeshift tripod. Secure your camera with rubber bands or tape. A backpack or a pile of clothes can also stabilize your device. Ensure the makeshift tripod is stable to avoid any damage to your equipment.
How Do You Make A Stable Tripod?
To make a stable tripod, extend the legs fully and evenly. Position it on a flat surface. Tighten all locks securely. Use a hook to add weight for extra stability. Adjust the center column minimally to maintain balance. Ensure all components are in good condition.
Conclusion
Creating a tripod stand is simpler than it seems. With basic materials, you can craft a sturdy support. This DIY project saves money and offers customization. You choose the height, style, and materials. Perfect for photography, camping, or home use.
Crafting skills improve with practice. Remember, patience is key. Take time to measure accurately. Safety first—handle tools carefully. Enjoy the creative process. Share your creation with friends and family. Inspire others to try their own projects. Building a tripod stand boosts confidence and skill.
Start today and experience the joy of DIY creativity.