Building a shooting tripod can be simple and rewarding. Start with basic materials and tools.
A homemade shooting tripod offers stability for your shots. It can enhance your photography or hunting experience. Creating one yourself saves money and provides a custom fit for your needs. Plus, it’s a fun DIY project. Whether you’re a seasoned shooter or a beginner, crafting a tripod can be a valuable skill.
With the right guidance, you can make a tripod that suits your style. This process involves understanding the parts and assembling them with care. It’s about precision and patience. Ready to learn? Discover how to craft your own shooting tripod and elevate your shooting game.
Credit: www.reddit.com
Table of Contents
Introduction To Shooting Tripods
Shooting tripods help keep cameras steady. They make photos clear and sharp. Photographers love them. Tripods are great for taking pictures in low light. They also help with long exposure shots. Videographers use them too. Tripods hold the camera still during video shoots. This makes videos smooth and professional-looking. Tripods are lightweight and easy to carry. Many people use them outdoors. A tripod can be used for wildlife and sports photography. They come in various sizes and designs. Some are tall, and some are short. Choose the one that fits your needs.
A tripod has three main parts. The legs are the first part. They support the tripod. The legs can be adjusted. This helps you find the right height. The head is the second part. It holds the camera. You can move the head up, down, left, or right. This helps in aiming the camera. The center column is the third part. It connects the legs and the head. This part can be raised or lowered for height adjustments. Understanding these parts helps in choosing the right tripod.
Gathering Materials
Building a shooting tripod needs specific tools. A saw helps cut wood or metal. A drill is key for making holes. Screwdrivers are handy for tightening screws. Measuring tape ensures accurate dimensions. Sandpaper smooths rough surfaces.
Material selection is crucial. Wood is popular for its lightness. Metal is durable but heavier. Plastic is lightweight but less sturdy. Consider the tripod’s use. Outdoor trips may need weather-resistant materials. Weight is vital for portability.
Building The Base
Crafting a sturdy shooting tripod involves selecting durable materials and ensuring stability. Use lightweight yet strong components for ease of transport. Assemble carefully, focusing on a balanced base to support precision shooting.
Crafting The Legs
Start by choosing strong, durable material for the tripod legs. Wood or metal works best. Cut three equal lengths for the legs. Make sure they are sturdy and even. Drill holes near the top of each leg. These holes will connect the legs to the base. The legs must be able to fold and unfold easily. Attach rubber feet to the bottom. This prevents slipping on smooth surfaces.
Assembling The Base
The base must hold the camera steady. Use a flat, solid platform. Cut a square or circle shape. Connect the legs to the base using bolts or screws. Ensure they are tight and secure. Test the tripod by placing weight on it. Adjust the height as needed by changing the leg length. The tripod should stand firm without wobbling.
Creating The Mount
Crafting a shooting tripod involves basic materials and tools. Start with sturdy legs for stability. Secure the mount to hold your camera or firearm firmly. Adjustability is key for different shooting angles. Simple steps ensure a reliable and functional tripod for various shooting activities.
Designing The Mount
Start with a strong plan for your tripod mount. A good design is crucial. It should hold the camera firmly. Choose materials that are durable. Wood or metal can be great choices. Measure carefully before cutting. Precise measurements ensure stability. Think about the shape of the mount. A flat surface works best. You may want to add padding. Padding protects the camera. Ensure the mount can swivel. Swiveling allows for easy movement. Make sure it’s adjustable. Adjustments help with different angles. Consider the weight of your camera. Heavy cameras need stronger mounts. Test the design with a mock-up. Testing helps identify any issues.
Securing The Mount
Secure the mount tightly. Use screws for added strength. Screws hold the mount in place. Ensure the mount doesn’t wobble. Wobbling can ruin shots. Add rubber grips if needed. Rubber grips prevent slipping. Check the tightness regularly. Loose mounts can cause problems. Double-check all connections. Connections must be secure. Consider using clamps. Clamps offer extra support. Be careful not to overtighten. Overtightening can damage equipment. Ensure the mount is level. Level mounts provide better balance. Test stability before shooting. Stability is key for clear images. A well-secured mount is essential. Essentials make shooting easier.
Adding Adjustability
A good shooting tripod needs to have height adjustment. This lets you set the tripod to the right level. Short or tall, it should fit all users. Most tripods have legs that can extend. Some have a center column that moves up and down. Always check how easy it is to adjust. A smooth adjustment makes it easier to use.
Stability is also very important. A stable tripod will not shake. It holds your camera or gun steady. Look for tripods with wide feet. They grip the ground better. Some tripods have rubber feet. Others have spikes. Spikes can be good on rough ground. Rubber is better on smooth floors. Make sure the tripod is strong. It should not wobble when you touch it.
Finishing Touches
Crafting a shooting tripod involves assembling sturdy materials for stability. Ensure each joint is tight and firm. Adding rubber feet and adjustable legs enhances grip and flexibility.
Painting And Polishing
Choose a color for your tripod. Use spray paint for an even coat. First, clean the tripod surface with a damp cloth. Make sure it’s dry before painting. Use light strokes with the spray paint. Apply a second coat if needed.
Once the paint is dry, polish the metal parts. Use a soft cloth for this. The polish will make it shine and protect it. Always polish in small circles for the best look.
Testing The Tripod
Place your camera on the tripod. Ensure it stands steady. Adjust the legs for balance. Check if the camera is secure on the top. Gently shake the tripod. It should not wobble or fall.
Try moving the tripod around. It should stay stable on different surfaces. Test the height adjustments. Make sure they lock in place.
Troubleshooting Common Issues
Tripod legs must be even. If they aren’t, the tripod may lean. Check each leg’s length. Adjust until all are the same. Look at the tripod head. It should face straight. If not, loosen the knob. Turn the head until it is right. Then, tighten the knob again. Always ensure parts are secure.
Loose screws can cause wobbly tripods. Use a screwdriver to tighten them. Check each joint. See if it moves more than it should. If yes, tighten it. Sometimes, parts might need replacing. Old screws can wear out. Get new ones if needed. Regular checks keep tripods in good shape.

Credit: www.youtube.com
Tips For Beginners
Safety is the most important thing. Always check your surroundings before shooting. Make sure there is no one in danger. Wear protective gear like glasses and earplugs. These protect your eyes and ears. Keep your tripod stable. Use a level surface to avoid tipping. Check that all parts are secure.
A strong tripod lasts longer. Use quality materials. Aluminum is light and strong. Stainless steel is also a good choice. Keep your tripod clean. Wipe it after each use. This stops dirt from damaging it. Store your tripod in a dry place. Moisture can cause rust. Lubricate moving parts to keep them smooth. Tighten any loose screws regularly.
Conclusion And Next Steps
Building a shooting tripod involves assembling materials and following straightforward steps. Begin with sturdy legs and a stable base. Secure all parts tightly for safety. With practice, creating a reliable shooting tripod becomes easier, enhancing your shooting experience.
Reflecting On The Process
Building a shooting tripod is fun. You learn new skills. First, gather materials like wood and screws. Next, assemble the tripod carefully. Safety is important. Always wear gloves. Measure twice, cut once. This saves time. Enjoy the process. Take breaks if needed. Ask for help if stuck. Friends can make it easier. Creating your tripod feels great. You gain confidence. Share your tripod with others. Encourage them to try. Learning is a lifelong journey. Keep exploring new projects. Your skills will grow.
Exploring Advanced Techniques
Try different tripod designs. Experiment with materials. Metal is strong. Plastic is light. Test stability with weights. Adjust angles for better shots. Add a camera holder. Use rubber feet for grip. Try telescopic legs. They extend and retract. Make it portable. Attach a carry handle. Explore color options. Bright colors stand out. Dark colors blend in. Customize your tripod. Add a logo or name. Make it unique. Learn from others. Watch online videos. Read books about photography. Improve your skills. Enjoy the journey.
Credit: www.youtube.com
Frequently Asked Questions
How Do You Make A Homemade Tripod?
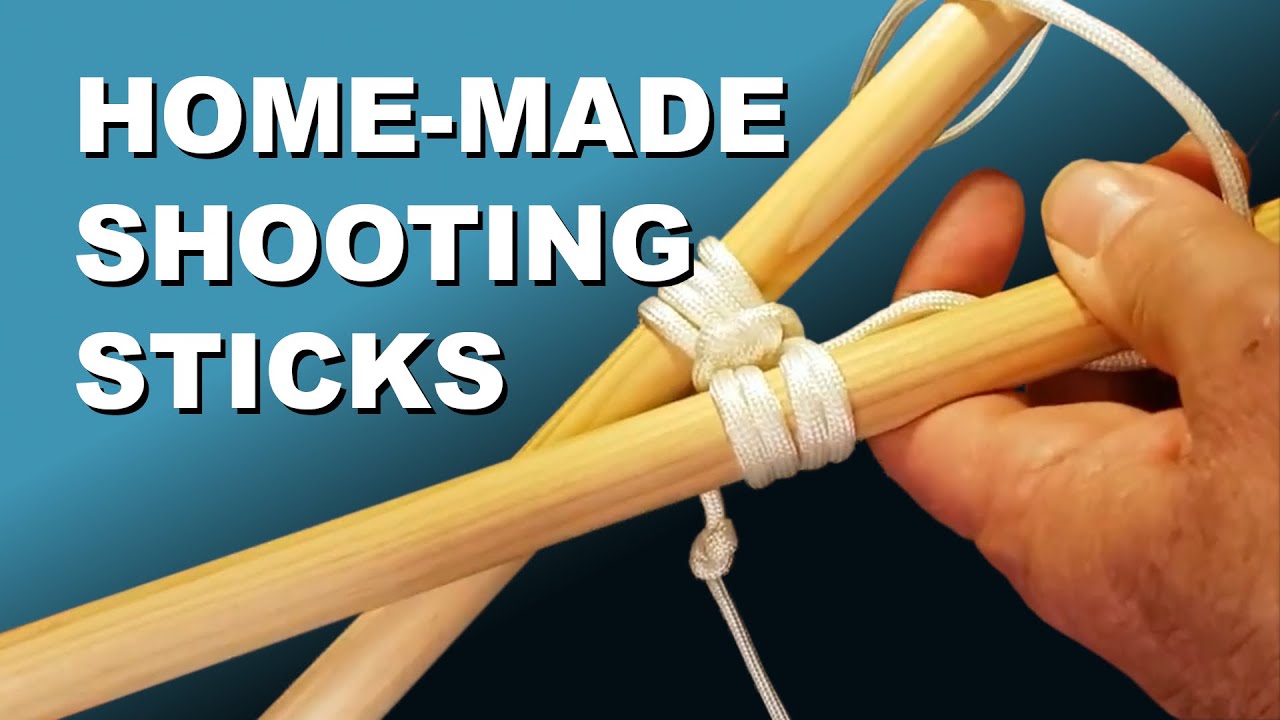
Create a homemade tripod using three sturdy sticks, string, and a rubber band. Bind the tops together securely. Spread the legs for stability and adjust the height.
What To Do If I Don’t Have A Tripod?
Use a stable surface like a table or chair to hold your camera. Stack books to adjust height. Utilize a bean bag for flexibility. Lean against a wall for extra support. Capture shots by placing the camera on the ground for a unique angle.
Can I Use A Camera Tripod For Shooting?
Yes, you can use a camera tripod for shooting. It stabilizes your camera, reducing shake and improving image quality. Ensure the tripod is compatible with your camera and suitable for the shooting environment. Tripods are ideal for long exposures, videos, and precise framing.
What Tripods Does The Military Use?
The military uses sturdy, high-quality tripods like the Manfrotto 055 and Gitzo series. These models offer durability and stability for various operations. Military tripods support heavy equipment and withstand harsh conditions, ensuring reliable performance during missions.
Conclusion
Building your own shooting tripod can be rewarding. It saves money. It offers customization to meet your needs. With simple materials, you can create a sturdy tripod. Follow the steps carefully. Ensure all components fit securely. A well-made tripod enhances shooting stability.
Plus, it boosts accuracy. Safety is key. Always double-check your setup before use. Practice using your tripod regularly. This helps improve your skills. Enjoy your DIY project. It adds a personal touch to your shooting experience. Now, you’re ready for a great shooting adventure.
Happy shooting!