Getting the grid on your camera is simple. This feature helps with composition.
It guides you in framing your shots better. Understanding how to enable this can improve your photography skills significantly. Cameras often have a grid setting, but not everyone knows its benefits or how to activate it. The grid divides your screen into sections, making it easier to align subjects and create balanced images.
Whether you’re a beginner or an experienced photographer, using the grid can be a game-changer for your photos. It helps in achieving the rule of thirds, a key principle in photography. This guide will walk you through the steps to enable the grid on different types of cameras, ensuring your photos are always well-composed and visually appealing. Get ready to explore the world of better-framed pictures!
Credit: www.iphonelife.com
Table of Contents
Introduction To Camera Grids
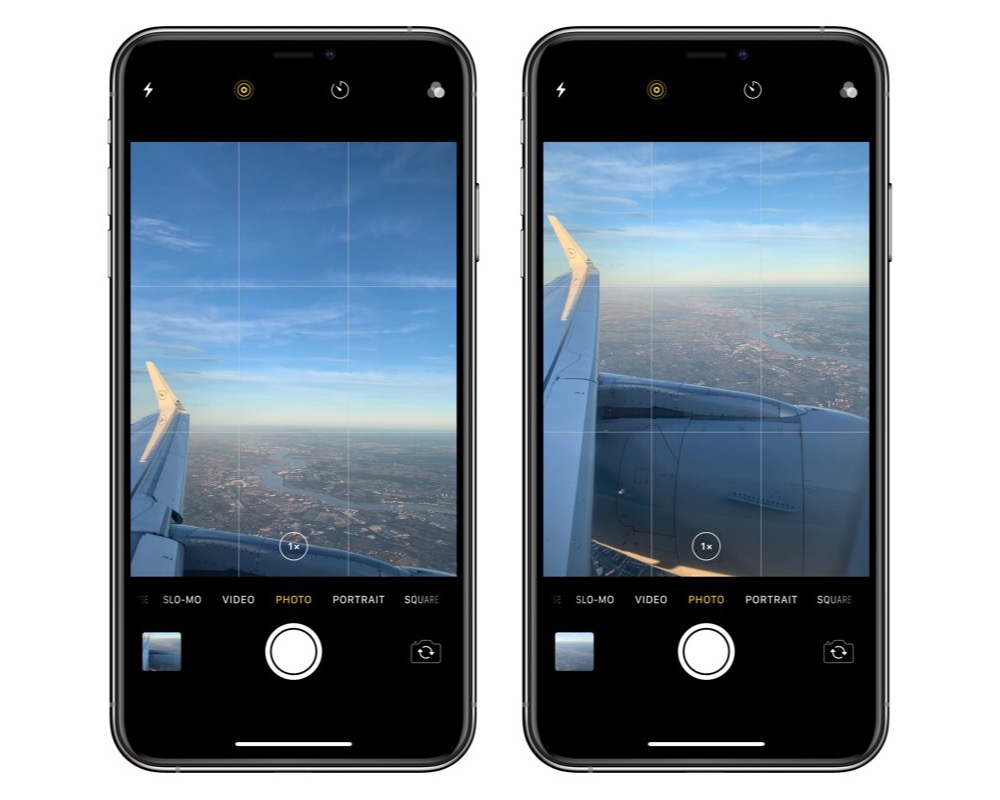
Camera grids are lines on the screen. They help with composition. These lines divide the frame into sections. Photographers use them for better shots. The rule of thirds is a popular grid. It splits the screen into three parts. This helps place subjects in the right spot.
Grid lines guide the eye. They help in aligning objects. Balance in photos is important. Grids make photos balanced. They help avoid crooked shots. Straight lines look clean and neat. With grids, the camera captures better angles.
| Grid Type | Function |
|---|---|
| Rule of Thirds | Divides into three equal parts |
| Diagonal Grid | Focuses on diagonal lines |
| Golden Ratio | Uses mathematical ratio |

Credit: www.iphonelife.com
Benefits Of Using Grids
Grids help in creating balanced pictures. They divide the frame into equal parts. This makes it easier to place subjects in the right spots. Pictures look more pleasing to the eye. Grids guide your focus to important areas. Your photos will have better composition. People will find your photos more interesting.
Aligning subjects becomes simple with grids. They act like guides. Objects will be straight and neat. Grid lines help in maintaining symmetry. It reduces crooked pictures. This makes images look clean and professional. Alignment adds order to photos. A well-aligned photo tells a clear story. Grids ensure that your photos look their best.
Activating Grids On Your Camera
Open your camera app. Look for the settings icon. This is usually a gear. Tap it. Find the grid option. Turn it on. You might see lines on the screen. They help you take better photos. Use the lines to center your subject. Or keep the horizon straight. Grids make photos look neat. They are easy to use. Practice and see the difference.
DSLR cameras have more settings. Use the menu button. Navigate to the grid settings. Choose the type of grid. Some cameras have lines or squares. Select the one you like. Grids help with framing. They guide your eyes. Make sure the camera is on. Then, look through the viewfinder. You should see the grid. Use it to align your shot.
Mastering The Rule Of Thirds
The rule of thirds helps in creating balanced photos. Imagine a grid over your photo. It has two vertical and two horizontal lines. This grid makes nine parts. Key parts of your photo should be on these lines. Place important subjects where lines meet. This draws the eye to them. It makes the photo more interesting.
Balance is important in a photo. Use the rule of thirds to help. Put your main subject on one side. Place other elements on the opposite side. This keeps the photo from looking heavy on one side. It makes the photo look even. Balanced photos are nice to look at. They make people feel good.
Applying Symmetry And Balance
Centered grids help create harmony in photos. They guide the viewer’s eyes to the middle. This is where the main subject often is. The grid divides the image into equal parts. This makes sure each side looks the same. Centered grids work well for portraits. They are also good for objects that need focus. Keep the main subject in the center box. This makes it stand out more. Symmetrical lines add a sense of calm. The viewer feels at ease. The eyes naturally follow the lines and focus on the center.
Balanced scenes make photos look even. The grid helps divide the space. Each part of the photo gets its own area. This helps in placing objects correctly. A balanced scene has equal weight on each side. Use the grid to check this. Balance can be left to right or top to bottom. Make sure nothing is too heavy on one side. This keeps the photo from looking tilted. Balance adds beauty and interest.
Experimenting With Different Grids
Diagonal grids add motion to photos. They make pictures feel alive. By using diagonal lines, you guide the viewer’s eye. Pictures become more exciting. The diagonal lines can create a sense of depth. This technique can make your photos stand out. Experimenting with different angles can be fun. It’s a way to see the world differently. Try using diagonal grids in nature shots. Buildings with diagonal lines look more interesting too. Diagonal grids can make even simple scenes look dynamic.
The golden ratio is a special number. It is about 1.618. This ratio is found in nature. Many artists use it in their work. In photography, it helps create balance. Photos feel more natural with this ratio. To use it, imagine a spiral on your photo. The spiral guides where to place important things. This can make your photo more appealing. It is often used in landscapes and portraits. Try placing the main subject on the spiral. This technique can improve your photos.
Common Mistakes To Avoid
Grids help with composition, but too much reliance can limit creativity. Photographers sometimes forget to explore other angles. They miss out on unique shots. Grids can make photos look similar. Experimenting with different positions is important. It brings new life to images. Balance is key. Use grids wisely but not always.
Subjects can add depth to photos. Ignoring their interaction limits storytelling. People or objects make a picture interesting. They tell stories. Observe how subjects move. Capture their emotions. Engagement with surroundings creates a dynamic image. Subjects can bring photos to life. Interaction is vital for compelling shots.
Credit: thesweetsetup.com
Practicing With Grids
Practice using grids every day. Start by choosing a simple subject. This could be a tree, a car, or a toy. Frame your subject using the grid lines. Place important parts of your subject where lines meet. This helps balance your photo. Take many pictures. Try different angles and distances. Review your photos. See which ones look best. Think about why they look good. Do this exercise daily. It helps your photography skills grow. It also improves your eye for detail.
Ask for feedback from friends. Feedback helps you learn faster. Compare your photos from week to week. Notice any improvements. Feel proud of your progress. Keep practicing every day. Over time, you will see big changes. Enjoy the process. Happy snapping!
Advanced Grid Techniques
Grids help tell stories with pictures. They guide eyes to important parts. Align your subject with grid lines. This makes photos balanced. Photos tell stories better this way. Each line on the grid has a role. Some lines show power. Others show calm. Choose lines based on your story. Grid placement changes how a picture feels. It makes viewers focus. Using grids helps in making photos interesting. Good photos are easy to understand. They make people feel something.
Creativity is key in using grids. Sometimes, break the rules. Place subjects differently. This can surprise viewers. New angles bring fresh looks. Experiment with grid lines. Turn your camera to see new perspectives. Creative grids make photos unique. They keep viewers interested. Use grids to play with light and shadow. This adds depth to pictures. Have fun with grids. They are tools to make art.
Frequently Asked Questions
How To Get Grid Lines On Camera?
Open your camera app settings. Locate the “Grid” option and toggle it on. Grid lines will appear.
How Do I Turn On The Grid On My Iphone Camera?
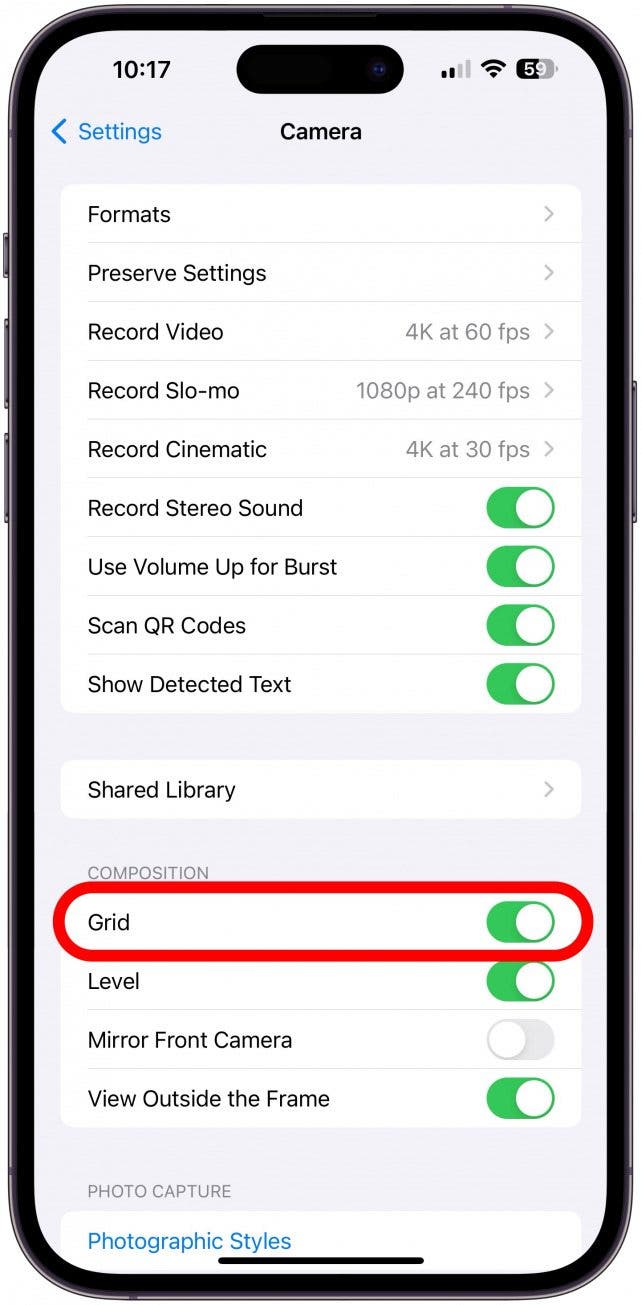
Open your iPhone Settings, go to Camera, and enable Grid. This helps compose shots and align subjects.
How Do I Turn On Gridlines?
Open your software, go to the “View” tab, and select “Gridlines” to enable them. This option varies by program, so check specific instructions if needed.
How To Get Photo Grid On Iphone 16?
To enable the photo grid on iPhone 16, open the Camera app. Go to Settings, tap on “Camera,” and enable the “Grid” option. This will display a 3×3 grid on your camera screen to help with composition.
Conclusion
Capturing great photos requires a bit of technique. Adding a grid enhances composition. It helps in aligning your subject perfectly. The grid is available on most cameras. You can find it in settings. Practice using it regularly. This improves your photography skills.
Soon, you’ll notice better framed shots. It’s easy, yet impactful. A small change makes a big difference. Remember, photography is about creativity. Let the grid guide you, not limit you. Keep exploring new angles and ideas. Photography is an art, so enjoy the process.
Happy shooting!