Importing photos from your camera to your Mac is simple. Connect your camera, and use the Photos app.
It’s that easy. Capturing memories with a camera is great, but storing them on your Mac keeps them safe. Whether you’re a budding photographer or just want to back up vacation photos, knowing how to transfer images is essential. Macs offer user-friendly tools that make this process smooth and efficient.
By importing your photos, you can edit, organize, and share them with ease. No more worries about losing those precious moments. This guide will walk you through each step, ensuring your photos move from camera to Mac without a hitch. Ready to free up space on your camera and secure your photos? Let’s dive in and start the transfer process.
Table of Contents
Preparation Before Importing
Ensure your camera is compatible with your Mac. Check the camera’s manual for details. Verify the type of connection your camera uses. Most cameras connect via USB or Bluetooth. Make sure you have the right cable. Older cameras may need different cables.
Some cameras need special software to transfer photos. Visit the camera maker’s website. Download any required drivers or software. Your Mac might already have some software. Photos app on Mac can help in many cases. Check if your camera needs anything extra. Always update software for best results.
Credit: discussions.apple.com
Connecting Camera To Mac
Plug your camera into the Mac using a USB or cable. Look for the USB port on your camera. Find the USB port on your Mac. Connect the USB cable to both devices. Check if the camera is turned on. Sometimes, you need to switch it on manually. Make sure the cable is securely connected.
Wait for the Mac to recognize the camera. A window may pop up on the screen. This window shows your photos. If no window appears, open the Photos app. In the Photos app, click Import. Select the photos you want to transfer. Click Import again to move them to the Mac.
Using Image Capture
Image Capture is a simple app on your Mac. It helps you move photos from your camera. First, connect your camera to your Mac with a USB cable. Your camera must be on. The app will open by itself. If it doesn’t, go to your Applications folder. Click on Image Capture to open it.
Once the app is open, you can see all your photos. Photos show up in a list. You can scroll through them. Each photo will have a small box next to it. This helps you choose which ones to import.
Click the box next to each photo you want. You can choose one or many photos. After selecting, find the Import button. It is usually at the bottom. Click it, and your photos will move to your Mac. Now your photos are safe and ready to view.
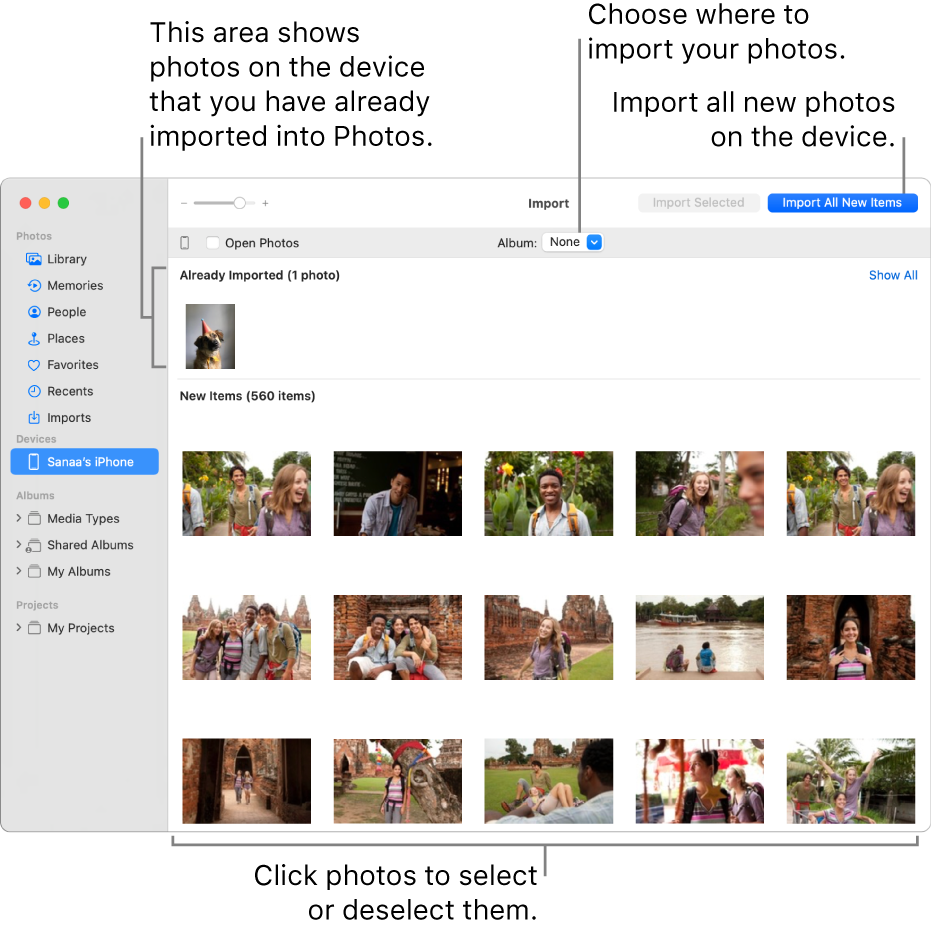
Importing Photos With Photos App
Open the Photos app on your Mac. Connect your camera with a USB cable. Wait for the photos to show up. This might take a few seconds. You will see your photos on the screen.
Choose the images you want to import. Click on each photo to select it. Selected photos will have a blue checkmark. Look for the Import button at the top. Click it to start importing. Photos will move to your library. Check your library to see the imported photos.
Utilizing Icloud For Transfer
Enable iCloud Photos to move pictures easily. Open Settings on your Mac. Click on your Apple ID. Then, choose iCloud. Here, you will find an option called iCloud Photos. Turn it on. This helps sync your photos.
Sync Photos Automatically across devices. Use the same Apple ID on all devices. Ensure you have enough iCloud space. Photos will upload when connected to Wi-Fi. This way, your photos stay safe. No cables needed. Enjoy easy access on your Mac.

Credit: www.youtube.com
Organizing Imported Photos
Create Albums to keep photos tidy. Albums help find photos fast. Group similar photos together. For example, holiday photos can go in one album. Use easy names for albums. Names should be simple and clear. This makes searching easy.
Tag and Label Photos to know more about each photo. Tags are short words or phrases. Tags describe what is in the photo. Labels tell more details. Add tags like “beach” or “family” to photos. Labels can include dates or places. This helps remember moments better. Good tags and labels make searching quick.
Troubleshooting Common Issues
Importing photos from a camera to a Mac can sometimes present issues. Check the cable connection and ensure your Mac recognizes the camera. Use Image Capture or Photos app to smoothly transfer your images.
Resolve Connection Problems
Ensure the camera is turned on. Check if the USB cable is properly plugged in. Try a different USB port on the Mac. Sometimes, the cable might be damaged. Use another cable if possible. Restart the Mac and the camera. This can fix connection issues. Update the camera’s firmware. It helps resolve many problems.
Fix Software Errors
Ensure the latest software updates are installed on your Mac. Open the Photos app on the Mac. Check if it recognizes the camera. Sometimes, a simple restart can solve the issue. Close the Photos app and reopen it. If issues persist, check for any error messages. Follow the instructions if any are shown.
Tips For Efficient Photo Importing
Importing photos can be simple. Use batch import to save time. Connect your camera to your Mac. Open the Photos app. Click on “Import” at the top. Select all the photos you want. Click “Import Selected”. This will move many photos at once. It’s faster than one by one. Keep your camera battery charged. Photos import best when the battery is full. Also, use a good USB cable. A good cable helps avoid errors. Make sure your Mac has enough space. Photos need room to import.
Backups are important. They keep your photos safe. Use an external drive for backups. Connect it to your Mac. Open “Time Machine” on your Mac. Set it to back up often. This way, your photos are never lost. Cloud storage is another option. Services like iCloud can save your photos online. They keep your memories safe. Always check your backup settings. Make sure everything is working well.
Credit: iboysoft.com
Frequently Asked Questions
How Do I Transfer Photos From My Camera To My Mac?
Connect your camera to your Mac using a USB cable. Open the Photos app on your Mac. Select “Import” to transfer photos. Choose the photos you want and click “Import Selected”. Disconnect the camera once the transfer completes.
Why Can’t I Import Photos From Camera To Mac?
Ensure your camera is powered on and properly connected via USB. Check for software updates on your Mac. Verify import settings in Photos or Image Capture. Try using a different USB cable or port. Restart your Mac and camera. Consider checking camera compatibility with your Mac.
How Do I Download Pictures From My Canon Camera To My Mac?
Connect your Canon camera to the Mac using a USB cable. Open Image Capture or Photos app. Select your camera. Choose the photos you want to download. Click “Import” to transfer images to your Mac. Make sure your camera is turned on during the process for successful transfer.
How To Transfer Photos From Camera To Computer?
Connect your camera to the computer using a USB cable. Turn on the camera. Open the file explorer. Locate your camera under “Devices”. Drag and drop photos to your desired folder on the computer.
Conclusion
Importing photos from your camera to a Mac is easy. First, connect your camera using a USB cable. Then, open the Photos app. Your Mac will recognize the device. Select the photos you want. Click “Import Selected” to save them.
Organize your photos in folders. This makes finding them simpler later. Regularly import new photos to keep your library updated. Don’t forget to back up your photos. Use an external hard drive for safety. Enjoy your captured memories on your Mac.
It’s straightforward and quick. Now you’re ready to share your photos with friends and family.